Blog

  • go-latest

    DockerToolbox logo
    Github Build Status Release Commits since release

    Overview

    This is a selection of Docker containers preinstalled with the latest stable version of go.

    We use our rbenv containers as the base to keep the install simple and consistent.

    Supported Operating Systems

    Operating System Docker Hub Repo Docker Hub Tags
    Alpine Linux 3.11 wolfsoftwareltd/go-latest-alpine 3.11
    Alpine Linux 3.12 wolfsoftwareltd/go-latest-alpine 3.12
    Alpine Linux 3.13 wolfsoftwareltd/go-latest-alpine 3.13
    Alpine Linux 3.14 wolfsoftwareltd/go-latest-alpine 3.14, latest
    Amazon Linux 1 wolfsoftwareltd/go-latest-amazonlinux 1
    Amazon Linux 2 wolfsoftwareltd/go-latest-amazonlinux 2, latest
    Centos 7 wolfsoftwareltd/go-latest-centos 7,
    Centos 8 wolfsoftwareltd/go-latest-centos 8, latest
    Debian 9 (Stretch) wolfsoftwareltd/go-latest-debian 9, stretch
    Debian 9 (Stretch Slim) wolfsoftwareltd/go-latest-debian 9-slim, stretch-slim
    Debian 10 (Buster) wolfsoftwareltd/go-latest-debian 10, buster
    Debian 10 (Buster Slim) wolfsoftwareltd/go-latest-debian 10-slim, buster-slim
    Debian 11 (Bullseye)] wolfsoftwareltd/go-latest-centos 11, bullseye, latest
    Debian 11 (Bullseye Slim) wolfsoftwareltd/go-latest-debian 11-slim, bullseye-slim
    Debian 12 (Bookworm) wolfsoftwareltd/go-latest-centos 12, bookworm
    Debian 12 (Bookworm Slim) wolfsoftwareltd/go-latest-debian 12-slim, bookworm-slim
    Ubuntu 14.04 (Trusty Tahr) wolfsoftwareltd/go-latest-ubuntu 14.04, trusty
    Ubuntu 16.04 (Xenial Xerus) wolfsoftwareltd/go-latest-ubuntu 16.04, xenial
    Ubuntu 18.04 (Bionic Beaver) wolfsoftwareltd/go-latest-ubuntu 18.04, bionic
    Ubuntu 20.04 (Focal Fossa) wolfsoftwareltd/go-latest-ubuntu 20.04, focal, latest

    Docker containers are automatically rebuilt and published weekly (Mondays 4am)

    Naming convention

    Local containers

    go-latest-<os>-<version> e.g. go-latest-debian-10
    

    Published containers

    wolfsoftwareltd/go-latest-<os>:<version> e.g. wolfsoftwareltd/go-latest-debian:10
    

    Development

    We do not include Dockerfiles with the repository as these are generated dynamically when required. We supply a helper script to do a lot of the heavy listing. The helper script is called manage-all.sh and can be from any level of the directory tree and is recursive.

    If you are in the top level directory you will need to use manage.sh instead of manage-all.sh

    Generate Dockerfiles

    ./manage-all.sh generate
    

    Build Containers

    ./manage-all.sh build [clean]
    

    Scan Containers

    ./manage-all.sh scan         
    

    Publish Containers

    ./manage-all.sh publish
    

    If you want to publish the containers you will need to update the utils.sh script and change the following line.

    DOCKER_HUB_ORG='wolfsoftwareltd'
    
    Visit original content creator repository https://github.com/DockerToolbox/go-latest
  • md-sim

    Molecular Dynamics Simulation

    Build Status

    A program simulating Molecular Dynamics (MD) fluids, with the option to use custom pair potentials, with a range of initial lattice and boundary conditions.

    Features

    • Multiple pair potentials (easily extensible):
      • Bounded Inverse Power (BIP)
      • Gaussian Core Model (GCM)
      • Exponential Pair Potential (EXP)
      • Lennard-Jones Pair Potential (LJ)
    • Multiple options for boundary conditions:
      • Periodic
      • Reflective
    • Multiple initial lattice starting positions:
      • Simple Cubic (SC)
      • Face Centred Cubic (FCC)
      • Body Centred Cubic (BCC)
      • Random, based on normal distributions
    • Multiple choices for iterative algorithms:
      • Explicit Verlet
      • Velocity Verlet
    • Statistical quantities calculation:
      • Mean Square Displacement (MSD)
      • Velocity Autocorrelation Function (VAF)
      • Radial Distribution Function (RDF)
      • Structure Factor (SFx, SFy, SFz)
    • 3D visualisation output through ParaView and CSV formatted logs
    • Fluid compression for phase transitions
    • Easy to use UI interface for setting up options
    • Unit and regression testing

    Getting Started

    Clone

    You can clone the project with all its submodules with:

    git clone --recurse-submodules https://github.com/GNikit/md-sim.git

    Build

    Build the library and the md executable:

    make -j

    Testing

    To run the test regression tests run:

    make tests
    make unit-tests

    To add tests look into the tests folder.

    Running a simulation

    The preferred way for passing in options for a run is through the use of a .xml file. Such .xml files can be found in the tests directory or made from scratch using diamond (more on that later)

    The following will run a simulation using an .xml input

    ./bin/md schemas/input_schema.xml

    However, libmd can still by manually passing arguments as seen from the two examples below. Code without the use of the xml parser can be found in the examples directory.

    Use libmd in your C++ project

    A minimal working example of how to use the libmd.a is shown below, make sure to link and include the static library and the header file MD.h to your program.

    #include "MD.h"
    
    int main() {
      options_type options;
    
      options.steps = 5000;                     // number of iterations
      options.density = 0.5;                    // fluid density
      options.target_temperature = 0.5;         // fluid thermostat temperature
      options.potential_type = "LennardJones";  // pair potential type
      options.particles = {10, 10, 10};         // number of particles in xyz
      // More fine tuning options are available see data_structures.h
    
      MD run(options);
      run.Simulation();
    }

    Alternatively, one can use the non-options data structures for initialising MD

    #include "MD.h"
    
    int main() {
      size_t steps = 5000;  // number of iterations
      double rho = 0.5;     // fluid density
      double t = 0.5;       // fluid temperature
    
      MD run(steps, {10, 10, 10}, "SimpleCubic");
      run.Simulation("demo_", rho, t, NAN, NAN, "LennardJones");
    }

    Visualise using ParaView

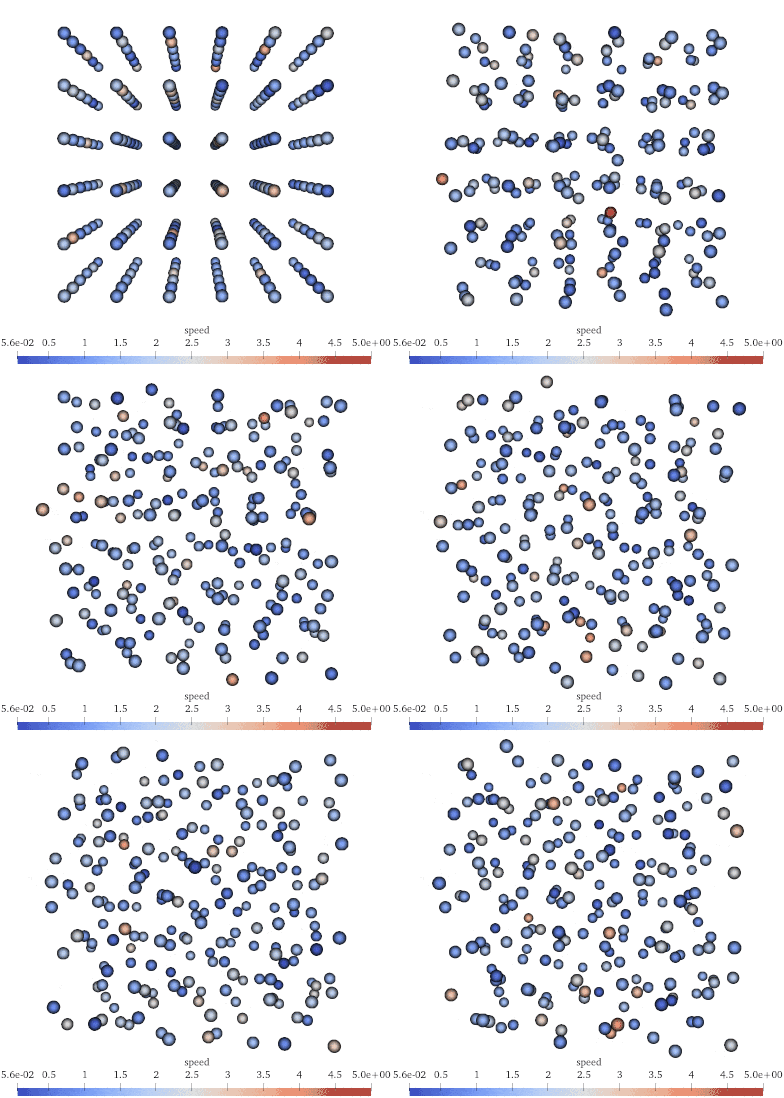
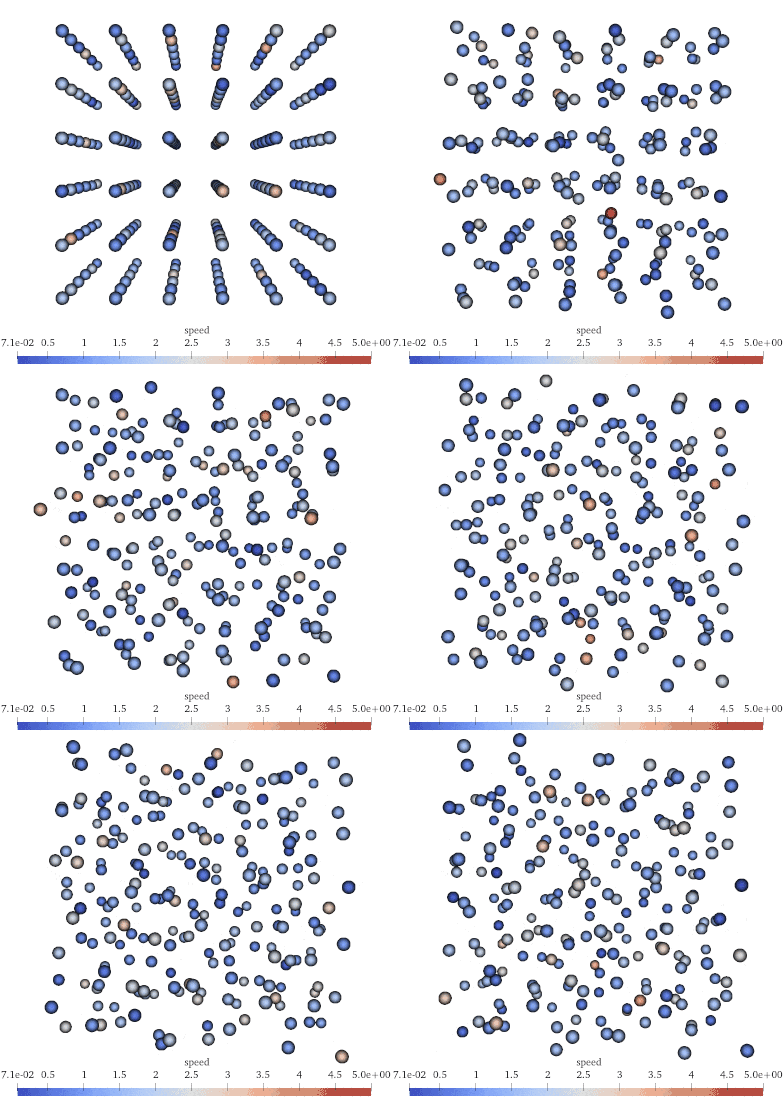
    To enable visualisation of the particles set the io/track_particles option to true in the schema, or directly set options.io_options.visualise = true before running a simulation.

    Then load the xzy_data_…csv into ParaView, select Table of Points from the available filters, set x, y and z positions. For a nicer view, change the default representation Surface to Point Gaussian and increase the Gaussian Radius. A full set of instructions on how to load CSV files to Paraview can be found here.

    Periodic Boundary conditions for a Lennard-Jones fluid Reflective Boundary conditions for a Lennard-Jones fluid
    Alt Alt

    Visualising log files

    The log files produced from a run (if io options have been enabled) contain a range of statistical quantities indicative of how the fluid develops over time. The files are in CSV format, so almost any plotting tool can be used to visualise their values. A Python submodule in included under tools/md-tools that uses numpy and matplotlib, but the code is far from complete or robust.

    Using diamond and libspud

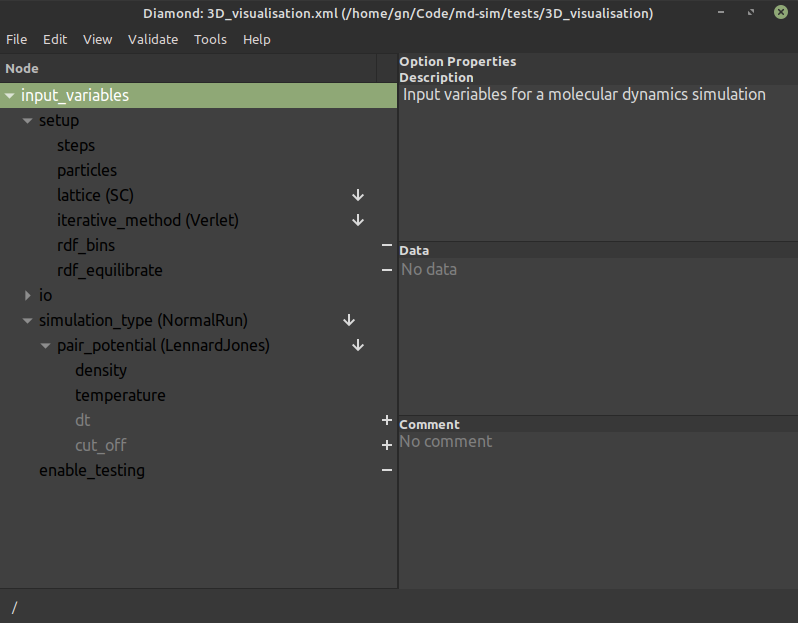
    This project relies on spud to easily read and set options from input files. Spud offers a visualisation tool called diamond to view the input options using a GUI. By default calling make on the top directory of md-sim compiles libspud and installs diamond and its helper functions in bin.

    Use the following command to launch the GUI against a test_file.xml

    ./bin/diamond -s schemas/main_schema.rng test_file.xml

    alt

    For more information about the diamond GUI see spud/doc/spud_manual.pdf

    Updating the schema

    If the schema files (rnc) are modified the rng files need to updated too. This can be done be calling:

    make schema
    Visit original content creator repository https://github.com/gnikit/md-sim
  • capacitor-printer-service

    lidta-capacitor-bl-printer

    lidta-capacitor-bl-printer is the first free Capacitor solution to fully support print most documents including html with structure and styles to blutooth pos thermal printers without breaking any sweat

    Currently only available for android devices

    Install

    npm install lidta-capacitor-bl-printer
    npx cap sync

    API

    printBase64(…)

    printBase64(options: { msg: string; align: number; }) => Promise<{ value: boolean; }>

    Print base64 string

    Param Type
    options { msg: string; align: number; }

    Returns: Promise<{ value: boolean; }>


    connect(…)

    connect(options: { address: string; }) => Promise<{ value: boolean; }>
    Param Type
    options { address: string; }

    Returns: Promise<{ value: boolean; }>


    disconnect()

    disconnect() => Promise<{ value: boolean; }>

    Returns: Promise<{ value: boolean; }>


    Documentation

    Visit Documentation Website

    Vue 3 Capacitor 6 exmaple

    The following component uses vue 3 with composition API Syntax

    <script setup>
    import { onMounted, ref } from 'vue'; //vue life cycle hooks(onMounted) and reactive (ref)
    import html2canvas from 'html2canvas'; //converts the html or any text to base64Image
    import { LidtaCapacitorBlPrinter } from 'lidta-capacitor-bl-printer'; //lidta-capacitor-bl-printer plugin
    
    const devices = ref([]);
    const connectedPrinter = ref({});
    const content = ref(null);
    
    const listDevices = async () => {
      await LidtaCapacitorBlPrinter.getPairedDevices().then((result) => {
          devices.value = result.devices || [];
      }).catch((error) => {
        alert(error);
      });
    }
    
    const printReceipt = async (device) => {
     await  LidtaCapacitorBlPrinter.connect({ address: device.address }).then(async () => {
       connectedPrinter.value = device.name;
       await  html2canvas(
          content.value,
        ).then(async (canvas) => {
        const base64Image =  canvas.toDataURL("image/png");
        LidtaCapacitorBlPrinter.printBase64({msg: base64Image, align: 1, /*0=>left 1=>center, 2=>right anything else=>invalid */ 
        }).then(() => { LidtaCapacitorBlPrinter.disconnect();
       }).catch((error) => alert(error)).finally(async () => {});
      }).catch((error) => alert(error));
      }).catch((error) => alert(error))
    };  
    </script>

    The following template uses Vuetify

    <template>
    <div class=" mt-8">
      <div  class="text-center" >
        <VBtn color="warning" class="text-center" variant="tonal"  @click="listDevices">
          <VIcon icon="mdi-printer" size="24" color="info" ></VIcon>List Connected Devices</VBtn>
      </div>
      
     <div class="text-center">
       <VBtn variant="tonal" class="mt-1" v-for="device in devices" :key="device" @click="printReceipt(device)" color="indigo">
      <VIcon icon="mdi-printer" ></VIcon>  Print on {{ device.name }} 
      </VBtn>
     </div>
      <div class="text-center">
        connected {{ connectedPrinter?.name }}
      </div>
    
    <div  ref="content" id="content">
        <h1>Hellow World</h1>
        <img  height="80" width="80" src="@/assets/logo.png"  />
    </div>

    Clone Full Vue 3 Capacitor 6 Example here

    Useful Links

    Official Website Lidta tech

    Support the Project

    This is the first free solution to fully support print most documents including html with structure and styles to blutooth pos thermal printers without breaking any sweat.

    Buy me a coffee

    Your support is greatly appreciated and will help me keep improving this project.

    Visit original content creator repository https://github.com/alfredkakuli/capacitor-printer-service
  • revealgo

    revealgo

    revealgo is a small web application for giving Markdown-driven presentations implemented in Go! The revealgo command starts a local web server to serve the your markdown presentation file with reveal.js. The presentation can be viewed in a web browser. The reveal.js library offers comprehensive presenting features such as slide transitions, speaker notes and more.

    Installation

    Binary

    Download the binary from GitHub Releases and install it somewhere in your $PATH. revealgo currently provides pre-built binaries for Linux, macOS and Windows.

    Homebrew

    You can also install via hombrew on macOS:

    $ brew install yusukebe/tap/revealgo
    

    Source

    To install from the source, use go install after git clone:

    $ git clone git@github.com:yusukebe/revealgo.git
    $ cd revealgo
    $ git submodule update --init --recursive
    $ go install ./cmd/revealgo
    

    Usage

    The usage:

    $ revealgo [options] MARKDOWN.md
    

    Then access the local web server such as http://localhost:3000 with Chrome, Firefox, or Safari.

    Available options:

    -p, --port            TCP port number of this server (default: 3000)
    --theme               Slide theme or original css file name. default themes:
                          beige, black, blood, league, moon, night, serif, simple, sky, solarized, and white (default: black.css)
    --transition          Transition effect for slides: default, cube, page, concave, zoom, linear, fade, none (default: default)
    --separator           Horizontal slide separator characters (default: ^---)
    --vertical-separator  Vertical slide separator characters (default: ^___)
    --multiplex           Enable slide multiplex
    

    Screenshots

    Run revealgo command:

    Command Line

    Open the server address with your web browser:

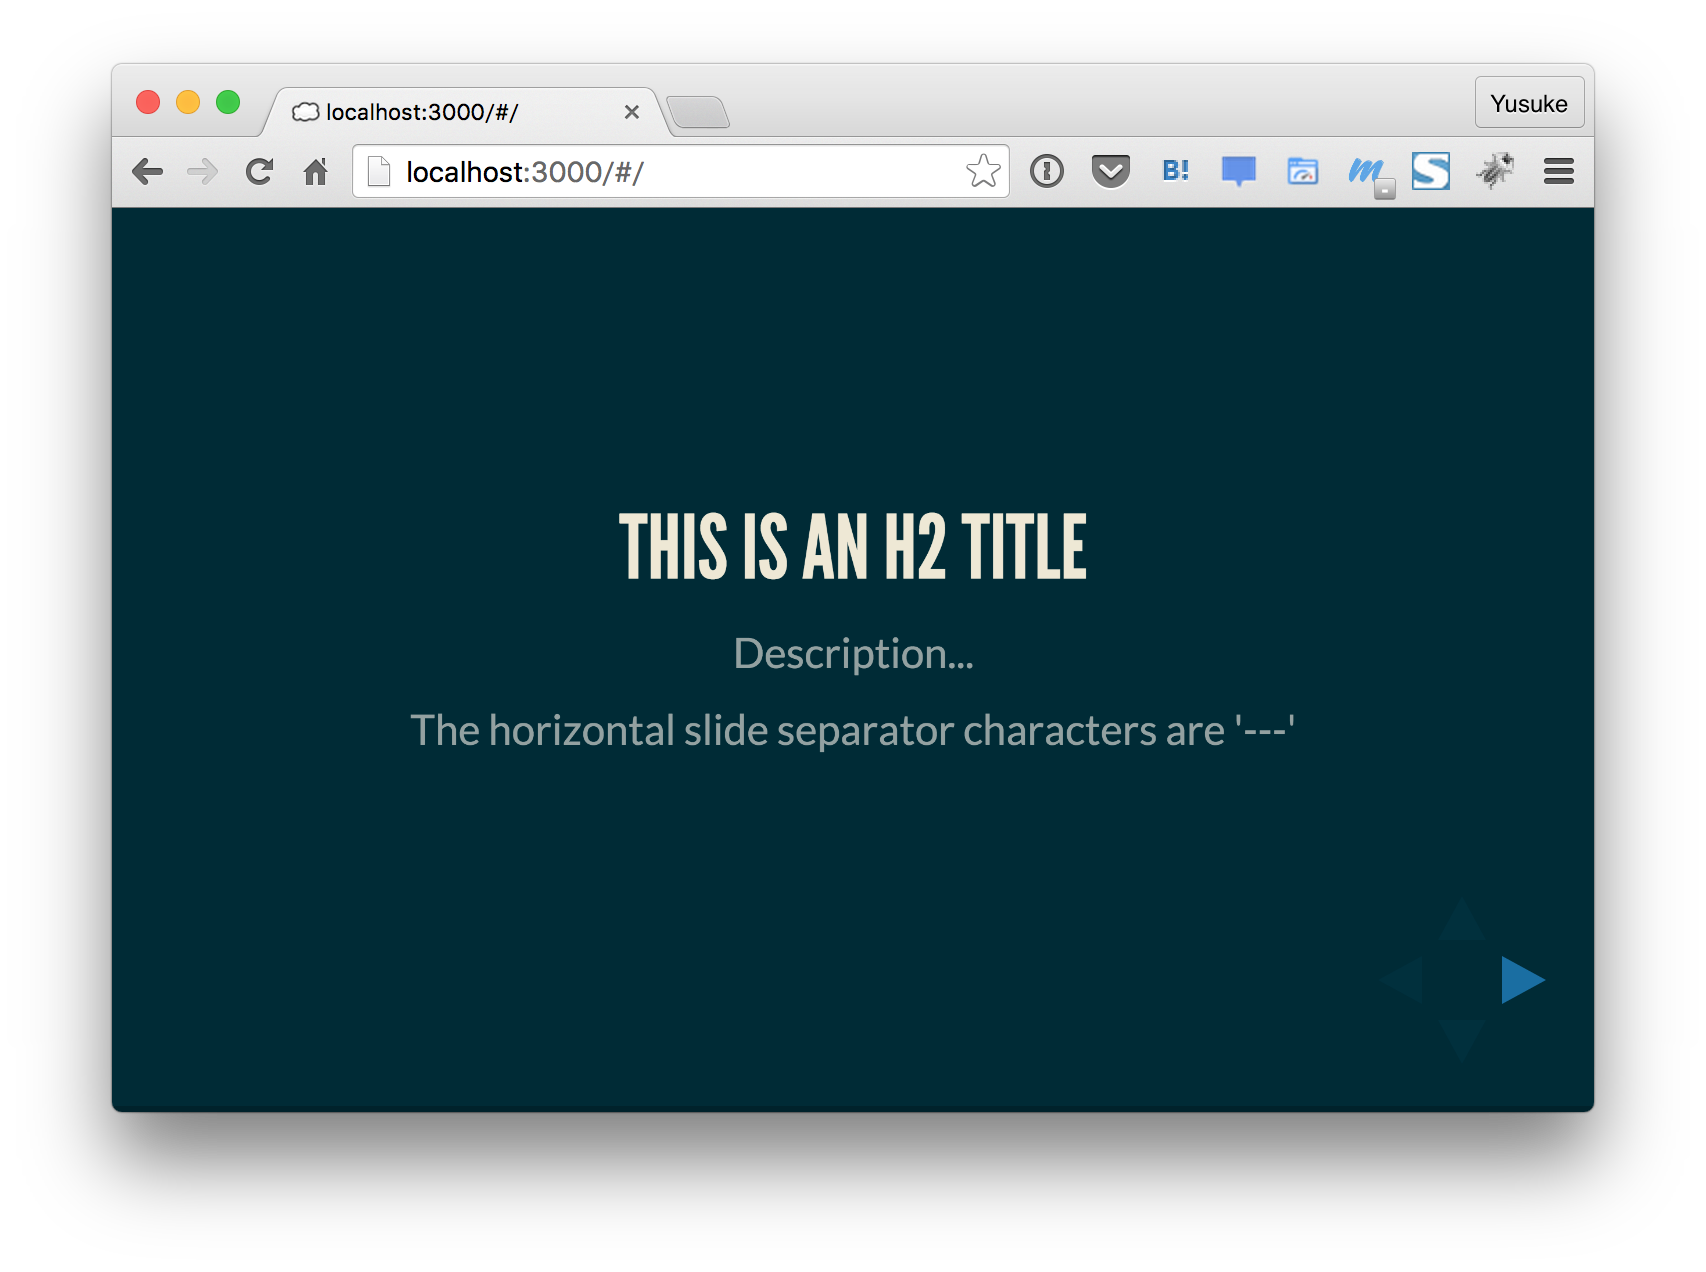
    Slides

    Sample Makrdown

    ## This is an H2 Title Description... The horizontal slide separator characters are '---' --- # This is second title The vertical slide separator characters are '^___' ___ ## This is a third title --- ## This is a forth title <!-- .slide: data-background="#f70000" data-transition="page" --> You can add slide attributes like above.

    Customize Theme

    While revealgo is running, open another terminal and get the theme file black.css:

    $ curl http://localhost:3000/revealjs/css/theme/black.css > original.css
    

    Edit original.css, And then run revealgo with --theme option:

    $ revealgo --theme original.css slide.md
    

    Customize Slide Configurations

    Get the default slide HTML file:

    $ curl http://localhost:3000/ > slide.html
    

    Edit slide.html, and then open http://localhost:3000/slide.html with your browser. A slide with the modified configurations will come up.

    Using slide multiplex

    The multiplex plugin allows your audience to follow the slides of the presentation you are controlling on their own phone, tablet or laptop

    reveal.js site

    When --multiplex is enabled, the client slides can be found on the / path and the master ones under /master/. The master presentation will push its changes to all the client ones for every transition, is like having a remote control!

    For example, your laptop’s IP address in the local network is 192.168.100.10 and you are using the port 3000, so your audience should see the slides on http://192.168.100.10:3000/, and you should be able to control their slides through http://192.168.100.10:3000/master/.

    NOTE: Bear in mind multiplex feature will not work as expected when 1) the presenter computer firewall denies incomig traffic or 2) the local network does not allow traffic between devices on the port you picked

    Related projects

    Contributing

    See docs/CONTRIBUTING.md.

    Contributors

    Thanks to all contributors!

    Author

    Yusuke Wada http://github.com/yusukebe

    License

    Distributed under the MIT License. See LICENSE for more information.

    Visit original content creator repository https://github.com/yusukebe/revealgo
  • pigmentjs

    PigmentJS 🐽 🍬

    PigmentJS is a very, very simple zero-dependency colour library built for web developers to easily create beautiful, legible, and accessible colour palettes.

    Quick Start

    Install

    npm i --save pigmentjs

    Use Pigment

    Instantiate PigmentJS to generate a random colour, or use a 3 or 6 character Hex string.

    JavaScript:

    // Require
    const { Pigment } = require("pigmentjs");
    // OR
    // Import
    import Pigment from "pigmentjs";
    
    Pigment(); // Random colour
    Pigment("#FFFFFF");
    Pigment("#F3C");

    TypeScript:

    import Pigment from "pigmentjs";
    
    const pigment: Pigment = Pigment("#22FF09");
    const complementary: string = pigment.complementary().hex; // '#E609FF'
    const triad: [Pigment, Pigment, Pigment] = pigment.triad();

    Create colours

    const pigment = Pigment("#22FF09");
    const complementary = pigment.complementary().hex; // '#E609FF'
    const triad = pigment.triad(); // [Pigment(), Pigment(), Pigment()];

    Pigment()

    API

    Getters

    Pigment().rgb

    Pigment().rgb; // [239, 56, 230]

    Pigment().irgb

    Returns RGB values as an object with r, g, b properties.

    Pigment().irgb; // {r: 239, g: 56, b: 230}

    Pigment().rgbString

    Pigment().rgbString; // '239, 56, 230'

    Pigment().hex

    Pigment().hex; // '#EF38E6'

    Pigment().hsl

    Pigment().hsl; // [302, 85.1, 57.8]

    Pigment().ihsl

    Returns HSL values as an object with h, s, l properties.

    Pigment().ihsl; // {h: 302, s: 85.1, l: 57.8}

    Pigment().hslString

    Pigment().hslString; // '302, 85.1, 57.8'

    Pigment().hue

    Pigment().hue; // 302

    Pigment().saturation

    Pigment().saturation; // 85.1

    Pigment().lightness

    Pigment().lightness; // 57.8

    Pigment().relativeLuminance

    Pigment().relativeLuminance; // 0.56

    Pigment().textColourHex

    Returns black or white, whichever will have a higher contrast relative to the
    primary colour.

    Pigment().textColourHex; // '#FFFFFF'

    Methods

    Always returns a new Pigment instance or an array of Pigment instances.


    Pigment().complementary()

    Converts colour to HSL, rotates Hue by 180 degrees.

    Pigment().complementary(); // Pigment() (complementary colour)

    Pigment().triad()

    Converts colour to HSL, rotates Hue by 120 degrees either side.

    const pigment = Pigment();
    pigment.triad(); // [colour (itself), Pigment(), Pigment()]

    Pigment().monochrome(5)

    Returns an array of colours with a monochromatic relationship to the input colour (i.e. an almost identical Hue).

    Params

    Size [Int] (required)

    • How many new colours to return

    const pigment = Pigment();
    pigment.monochrome(3); // [Pigment(), Pigment(), Pigment()]

    Pigment().shades(5)

    Returns an array of colours with black mixed progressively.

    Params

    Size [Int] (required)

    • How many new colours to return

    const pigment = Pigment();
    pigment.shades(3); // [Pigment(), Pigment(), Pigment()]

    Pigment().tints(5)

    Returns an array of colours with white mixed progressively.

    Params

    Size [Int] (required)

    • How many new colours to return

    const pigment = Pigment();
    pigment.tints(3); // [Pigment(), Pigment(), Pigment()]

    Visit original content creator repository
    https://github.com/fundamentalshop/pigmentjs

  • zap

    zap

    zap is a library to display simple yet customizable notifications in Svelte.
    You can stylize text with a simple syntax, add buttons to make the notifications interactable and add callbacks for some events during the life of a notification.

    You can find a live demo here: https://zap.nikurasu.org/
    You can also run the demo locally by installing the dependencies and then run pnpm run dev.

    Installation

    npm version

    pnpm add @glagan/zap

    How to use

    zap needs a container to display the notification, you need to have the component ZapContainer included somewhere, e.g in your index.

    <script>
    	import { ZapContainer } from '@glagan/zap';
    </script>
    
    <ZapContainer />

    Once the container is available, you can display notifications by interacting with the zap store.

    <script>
    	import { zap } from '@glagan/zap';
    
    	zap.success({ title: 'zap' });
    </script>

    Templates

    There is 5 default templates: success, error, info, warning and message.

    zap.success({
        title: 'Title', // The title of the notification
        image: 'url', // Optional image displayed inside the notification
        imageAlt: 'image', // Optional image alt text
        message: 'Content', // Content of the notification
        // Optional list of buttons to interact with the notification
        buttons: [{
            value: 'Confirm', // The text inside the button
            type: 'success', // The type of the button, same as for the notifications
            onClick: (notification) => {
                // The onClick function receive the notification from which the button has been clicked
                // You can call notification.remove(), notification.close() or notification.closeFadeout()
                // if you wish to remove the notification by clicking on  the buttons
            }
        }],
        classes: ['class'] // Optional additional CSS classes applied to the notification
    }, options); // See the the list of options below

    All keys in the first parameter are optional, but at least one of title, image or message is required.

    You can still update the content and state of any notification after it’s been created by updating the values in the Notification object that was returned by zap:

    const notification = zap.success({ title: 'zap' });
    notification.title = 'ZAP';
    notification.repaint(); // A repaint() call is necessary (for now ?)

    Options

    There are a few options that you can set by using zapOptions.setDefault(options) or more specifically for a single notification on the third parameter.

    Name Description Default
    duration The time (in ms) that the notification is displayed. 4000
    position Valid positions: top-left, top-center, top-right, bottom-left, bottom-center and bottom-right. “top-right”
    sticky If true, the notification will not disappear until the user clicks it or its close button. false
    closeButton If true, a close button will be added either on the title or the content. true
    closeOnClick If true, clicking anywhere in the notification will close it. true
    removeAllOnDisplay If true, all notifications will be cleared before the new one is added to the screen. false
    maxNotifications If >0, notifications (starting with oldest) will clear out until the number displayed is less than or equal to the specified option. 0
    events Object with events functions, see Events.
    insertAnimation Object with CSS class name and duration, see Animations. { name: 'default-insert', duration: 250 }
    removeAnimation Object with CSS class name and duration, see Animations. { name: 'fadeout', duration: 400 }
    display Display the notification when creating it. true

    Events

    There are four events during the process of displaying every notification:

    • onCreate(notification) called when the notification node is created but empty.
    • onDisplay(notification) called when the notification node is appended to its wrapper.
    • onDeath(notification) called when the duration timer has expired.
      • If you set the onDeath function you take ownership of the notification removal and you need to call notification.close() or notification.destroy() manually, or else the notification won’t disappear.
    • onDisplay(notification) after the notification has been closed.

    Animations

    You can customize the insert and remove animations of a notification by giving a value to the insertAnimation (or removeAnimation) option. The option take an object like the following:

    {
        name: "default-insert", // See the list below
        duration: 250 // In ms
    }

    The insert animations are: insert-[left|top|right|bottom], fadein, scalein and rotatein.

    By default the animation is default-insert which is a special value that automatically choose the corresponding insert animation after the notification position.

    The remove animations are: fadeout, scaleout and rotateout.

    You can add your own animations by adding them in your own CSS files and setting the name of the animation in the parameter.

    minimark

    zap uses minimark to render the text inside the notifications.
    You can check the minimark documentation to see how to add or write tags.

    Migration

    If you were using SimpleNotification, a few changes have been made:

    • closeAnimated is replacing close and is now the default and the old close has been renamed destroy
    • The setters have been removed, you can now directly use assignments in callbacks (e.g notification.title = 'Title' intead of notification.setTitle('Title'))
    • The text renderer is now an external dependency and the tags definition (not the syntax) has changed, see minimark documentation for the new definition

    Credits

    This package is a port of SimpleNotification for Svelte. If you want to use the same notifications but outside of Svelte or any other frameworks, use Simple Notification.

    Visit original content creator repository https://github.com/Glagan/zap
  • codemirror-blocks

    Build Status Coverage Status Code Climate

    codemirror-blocks

    codemirror-blocks is a project to make programming languages editable using visual blocks.

    About this repository

    This repository contains the code for all the packages maintained by the codemirror-blocks team, including the core codemirror-blocks library, and various language modules that implement block editors for individual languagues using the core library. Documentation for individual packages can be found in their respective directories:

    • codemirror-blocks – the core library used to make block editors. Start here if you’d like to implement a new block editor for a programming language of your choice.
    • wescheme-blocks – a block editor for the wescheme programming language.

    Contributing Changes

    To contribute changes to any of the packages in this repository, you’ll need to setup a development environment.

    Dev Environment

    To get your dev environment up and running, follow these steps.

    1. Clone the repository onto your local machine

    2. Install dependencies with npm

      npm install
      

      Note: This repository uses npm workspaces, so you’ll need to use npm v7 or later.

    3. build the library and generate type declarations

      npm run build --workspaces
      npm run build-types --workspaces --if-present
      
    4. run tests to confirm everything is setup correctly. This will run all tests in all sub-packages

      npm run test
      

    Development Workflow

    At any given time, you’ll probably be working in only one of the repo’s sub-packages. Each package provides it’s own set of npm scripts to help with the build/test process. You can either run these scripts from the repository root and specify which package you are working on with --workspace=<package-name> or you can run the scripts from that packages directory without the --workspace setting. The following assumes you are doing the latter.

    CMB is written in a combination of typescript and javascript, with some language extensions (like jsx syntax) that are handled by babel. As such, before any code can actually be executed, it must be transpiled to javascript. The easiest way to do this during development is to run each of the following commands in their own terminal:

    1. Continuously transpile code from the src/ directory to the lib/ directory with babel:

      npm run build-watch
      
    2. Continuously run typechecks and generate type declaration files in lib/ with typescript:

      npm run build-types-watch
      
    3. With these two processes running, you can then start the development server in yet another terminal with:

      npm start
      

      then open http://localhost:8080 in your browser to see CMB running on a web page. This web page just executes the example javascript from example/ediotor-example.js, but will automatically update whenever any code is changed.

    4. Finally, you can also run tests continuously whenever code is changed. This should always be done from the repository root to make sure you don’t inadvertantly break an API that another package is depending on.

      npm run test-watch
      

    Coverage reports can be generated by passing the --coverage flag to the test command:

    npm test -- --coverage
    

    The reports will be written to the .coverage/ directory.

    Visit original content creator repository https://github.com/bootstrapworld/codemirror-blocks
  • serverlessDotNetStarter

    serverlessDotNetStarter .NET 6

    Starter template for serverless framework with following scope:

    • deploy C# / NET 6 solution in AWS cloud using:
      • Lambda
      • Api Gateway
    • debug and test solution locally in Visual Studio Code
    • works operating system independent

    Prerequisites to install

    Verify that everything is installed (copy & paste)

    # package manager for nodejs
    npm -v
    # serverless framework cli > 1.5
    sls -v
    # dotnet (cli) > 6.0
    dotnet --version

    Installation (copy & paste)

    # clone solution
    # serverless create --template-url https://github.com/pharindoko/serverlessDotNetStarter --path {SERVICE_NAME}
    serverless create --template-url https://github.com/pharindoko/serverlessDotNetStarter --path serverlessDotNetStarter
    cd serverlessDotNetStarter
    # restore / install dotnet references described in csproj file
    dotnet restore AwsDotnetCsharp.csproj
    
    # install Lambda NET Mock Test Tool and Amazon Lambda Tools
    # more details: https://github.com/aws/aws-lambda-dotnet/tree/master/Tools/LambdaTestTool
    
    dotnet tool install -g Amazon.Lambda.Tools
    dotnet tool install --global Amazon.Lambda.TestTool-6.0
    dotnet tool list -g
    
    # required dotnet packages:
    #
    # Package Id                      Version      Commands
    ------------------------------------------------------------------------
    #amazon.lambda.testtool-6.0      0.12.4       dotnet-lambda-test-tool-6.0
    #amazon.lambda.tools             5.4.5        dotnet-lambda

    For VS Code Debugging:

    code --install-extension ms-dotnettools.csharp --force

    Debug & Test locally

    I followed this guideline: (Please read in case of issues)

    How to Debug .NET Core Lambda Functions Locally with the Serverless Framework

    1. Open Visual Studio Code

    # open Visual Studio Code
    code .

    2. Setup Amazon Lambda Testtool

    Edit the “program” property in .vscode/launch.json file and update placeholder for {user} (placeholders marked in bold)

    For Windows
    
    "program": /Users/{user}/.dotnet/tools/dotnet-lambda-test-tool-6.0
    
    For MacOs / Linux
    
    "program": /Users/{user}/.dotnet/tools/dotnet-lambda-test-tool-6.0
    

    More information:

    In case of issues – try this:

    
      "program": /Users/{user}/.dotnet/tools/.store/amazon.lambda.testtool-6.0/{nuget-version}/amazon.lambda.testtool-6.0/{nuget-version}/tools/net6.0/any/Amazon.Lambda.TestTool.WebTester6.0.dll",
    

    how to get the right nuget version ?

    
       dotnet tool list -g
    
       Result:
        Package Id                      Version                   Commands
        ------------------------------------------------------------------------
        amazon.lambda.testtool-6.0      e.g. version 0.12.4       dotnet-lambda-test-tool-6.0
      

    3. Press F5 to start the debugging and local testing of lambda function

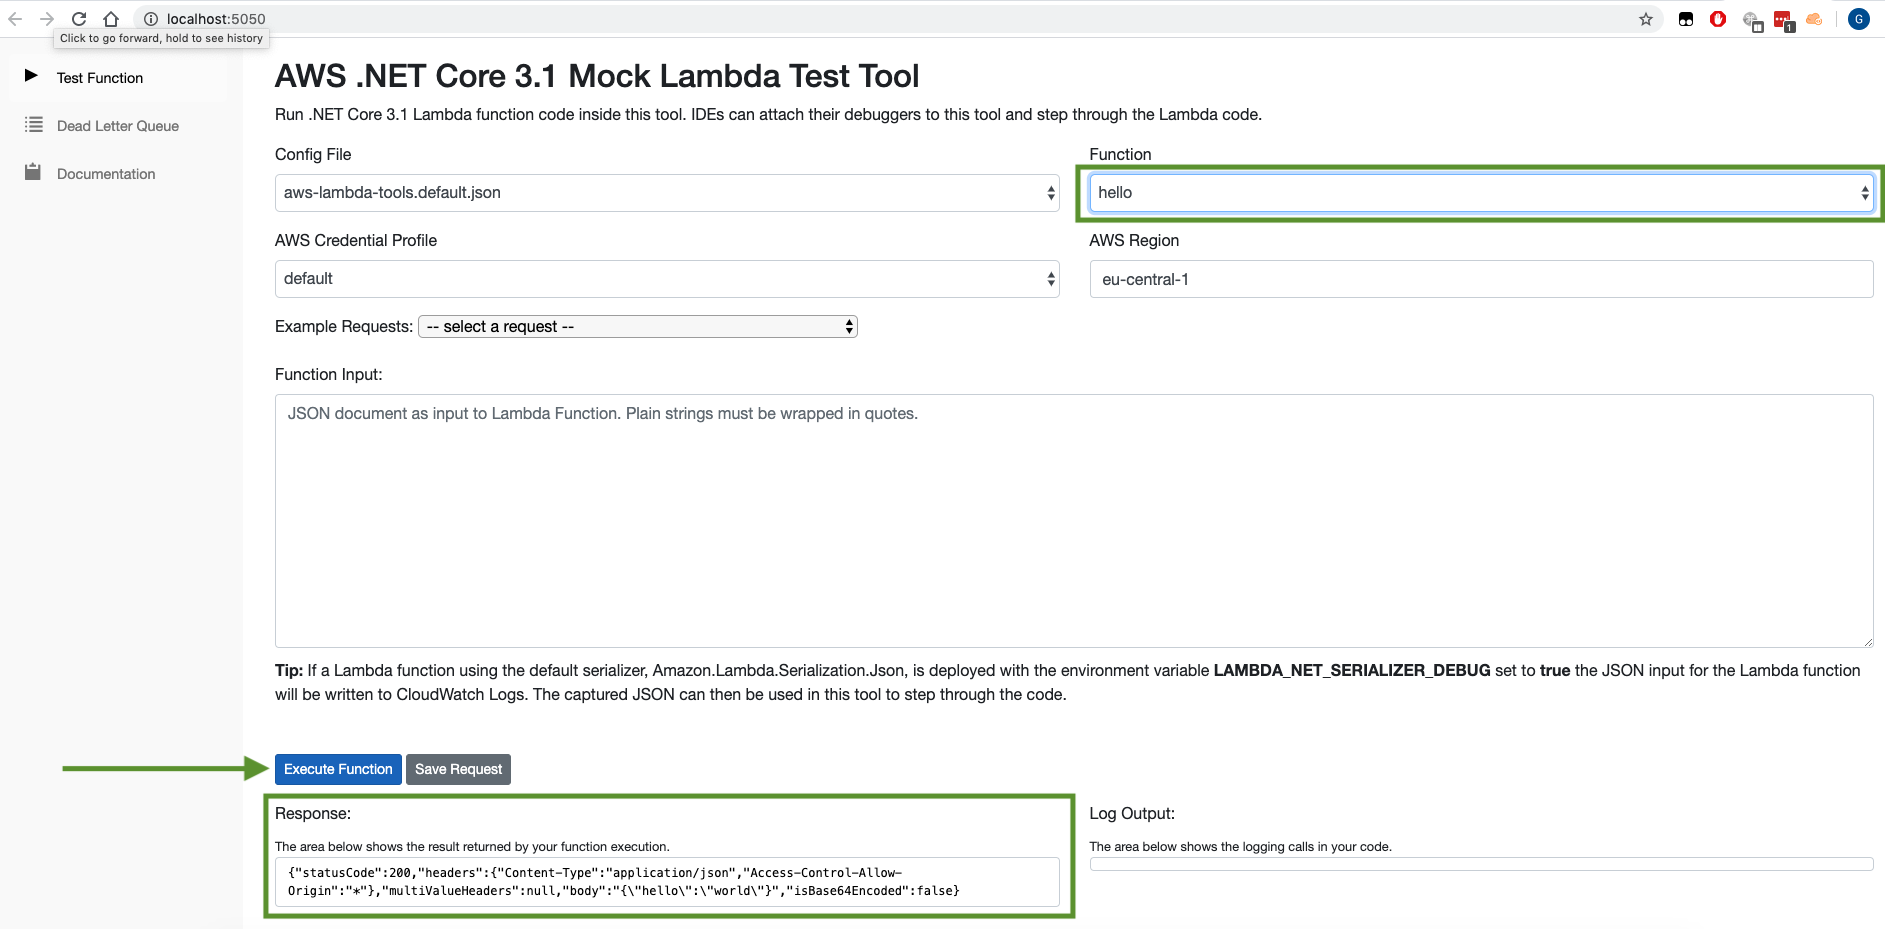
    • Hint: Lambda Mock Test Tool should be started locally on port 5050
    • Click on Button “Execute Function”

    Image description

    you should get hello world as a result.

    Test Another Example: getquerystring

    1. Select function to getquerystring (upper right dropdownlist)

    2. Insert this json value in the function input textbox for a first test:

      {
        "httpMethod": "GET",
        "queryStringParameters": {
          "foo": "dfgdfg",
          "woot": "food"
        }
      }

    Mind: For a successful response querystringParameter foo must be inserted

    Build Package

    Mac OS or Linux

    ./build.sh

    Windows

    build.cmd

    Deploy via Serverless Framework

    serverless deploy

    A cloudformation stack in AWS will be created in background containing all needed resources

    After successful deployment you can see following output

    Service Information
    service: myService
    stage: dev
    region: us-east-1
    stack: myService-dev
    resources: 10
    api keys:
      None
    endpoints:
      GET - endpointUrl --> https://{api}.execute-api.us-east-1.amazonaws.com/dev/hello
    functions:
      hello: myService-dev-hello
    layers:
      None


    Test endpoint after deployment

    2 simple options:

    Use the endpointUrl from up above.

    curl https://{api}.execute-api.us-east-1.amazonaws.com/dev/hello
    curl https://{api}.execute-api.us-east-1.amazonaws.com/dev/getquerystring?foo=test

    Mind: For a successful response of function getquerystring the querystringParameter foo must be inserted

    FAQ

    Can I use the solution with Visual Studio IDE (2017 or 2019)
    1. Yes. Here`s the guideline.
    How to add an api key
    1. Setup API Key in serverless.yml file https://serverless.com/framework/docs/providers/aws/events/apigateway/#setting-api-keys-for-your-rest-api
    How to add additional lambda functions
    1. Create a new C# Function in Handler.cs or use another file
    2. Add a new function to serverless.yml and reference the C# Function as handler https://serverless.com/framework/docs/providers/aws/guide/functions/
    Destroy the stack in the cloud
    sls remove
    I deployed the solution but I get back a http 500 error
    1. Check Cloudwatch Logs in AWS – the issue should be describe there.
    2. For a successful response of function getquerystring the querystringParameter foo must be inserted
    How can I change the lambda region or stack name

    Please have a look to the serverless guideline: https://serverless.com/framework/docs/providers/aws/guide/deploying/

    Visit original content creator repository https://github.com/pharindoko/serverlessDotNetStarter
  • challenge-ibge-news


    Logo
    Vencedor!

    IBGE News

    Fique por dentro das últimas notícias do IBGE, na melhor forma!
    Demo · Documentação · Sobre o desafio · Autor

    Tabela de tópicos
    1. Sobre o projeto
    2. Como rodar a aplicação
    3. Resultado – Deploy
    4. Licença
    5. Autor

    Sobre o projeto

    IBGE News é um projeto que foi desenvolvido como solução de um desafio técnico de React

    Essa é uma aplicação Web de páginas de notícias do IBGE (Instituto Brasileiro de Geografia e Estatística) que são obtidas através de sua API de Notícias oficial.

    O objetivo da aplicação com a obtenção das notícias é disponibilizar, organizar, filtrar e informar sobre as últimas notícias do IBGE de forma simples e intuitiva, com uma experiência de usuário agradável e responsiva.

    Principais Features

    • Notícias recentes sempre atualizadas, obtidas de uma API
    • Design responsivo em qualquer dispositivo
    • Filtragem de notícias, por: Mais Recentes, Release, notícia e favoritas
    • Funcionalidade de favoritar suas notícias preferidas, sendo salvas no localStorage
    • Botão de mudar o layout da listagem de notícias (a partir de telas maiores)
    • Acesse a notícia completa com apenas um clique

    Tecnologias/Ferramentas utilizadas:

    • React
    • TypeScript
    • CSS3
    • Testing-Library
    • Vite
    • GitHub
    • Figma

    Porque a escolha dessas tecnologias/ferramentas?

    React: O React foi utilizado com TypeScript para criação das interfaces de usuário (UI) web. Sua escolha é por ser popular, fácil de usar, altamente flexível e escalável. Como grande vantagem do React, para o gerenciamento de contexto foi utilizado o ContextAPI que provém juntamente com a biblioteca.

    TypeScript: O TypeScript foi utilizado para adicionar tipagem estática ao JavaScript, trazendo mais segurança e facilidade para o desenvolvimento.

    CSS3: O CSS3 foi utilizado para estilização dos componentes e páginas. Nessa aplicação, o CSS foi utilizado de maneira pura, sem o uso de bibliotecas de estilização (com exceção do Modern Normalize, utilizado para padronizar os estilos em diferentes navegadores), trazendo uma customização única e feita puramente para essa aplicação.

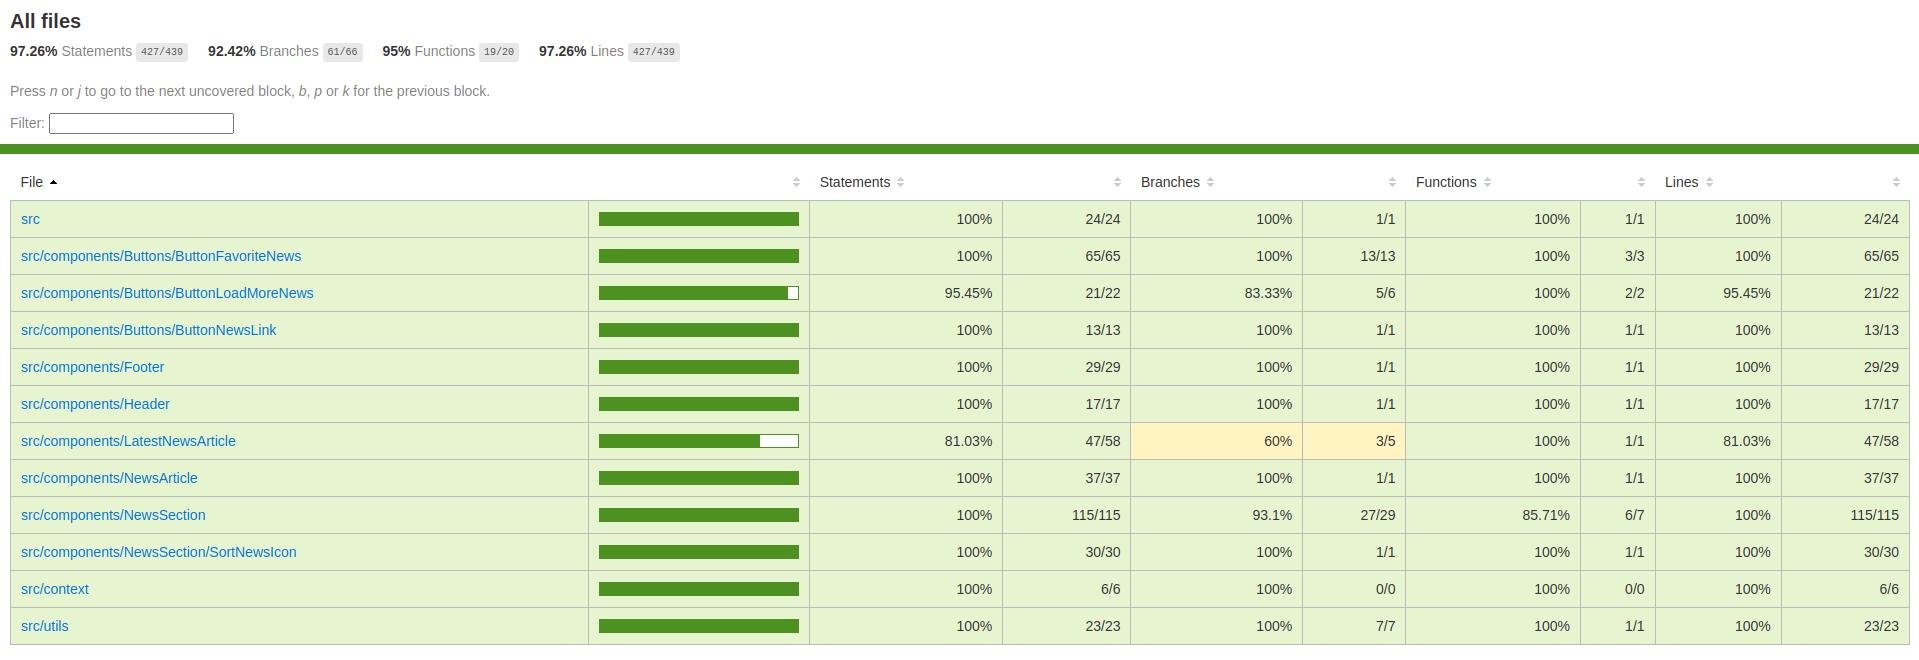
    Testing Library: O Testing Library foi utilizado para a criação de testes unitários e de integração. A criação de testes é um importante indicador de que as funcionalidades estão sendo verificadas, como o Mock da API e testes das principais funcionalidades. Por isso, a biblioteca foi utilizada e o projeto foi testado atingindo no minímo 90% de cobertura total de testes, 95% em funções e mais de 97% em lines e statements.

    Vite: O Vite foi utilizado como bundler da aplicação. Sua escolha foi por ser uma ferramenta nova, rápida e que traz uma experiência de desenvolvimento agradável.

    GitHub: O GitHub foi utilizado para hospedagem do código fonte e da aplicação, além da utilização de seu serviço de hosting (GitHub Pages) para o deploy da aplicação.

    Figma: O Figma foi utilizado para criação do design da aplicação com base em um modelo provido do desafio técnico, sendo ele customizado e melhorado para uma melhor navegação e experiência.

    Como rodar a aplicação

    Instruções para rodar a aplicação localmente. Certifique de seu ambiente esteja configurado e utilizando as dependências corretamente das tecnologias utilizadas.

    Para rodar a aplicação localmente, siga as instruções abaixo:

    Pré-requisitos

    Antes de começar, certifique-se de ter o Node.js e o npm (gerenciador de pacotes Node.js) instalados em seu ambiente.

    Passos de Instalação

    1. Clone o repositório do GitHub em sua máquina local:

      git clone git@github.com:gabrielmoisesa/challenge-ibge-news.git
    2. Navegue até o diretório do projeto:

      cd challenge-ibge-news
    3. Instale as dependências do projeto usando o npm:

       npm install
    4. Após a instalação das dependências, você pode iniciar o servidor de desenvolvimento:

       npm run dev

    Se tudo estiver configurado corretamente, o servidor será iniciado localmente e você poderá acessar o aplicativo em seu navegador em http://localhost:3000.

    Resultado – Deploy

    Além de poder rodar localmente, a aplicação foi hospedada no GitHub Pages, como descrito na parte de tecnologias utilizadas.

    Licença

    Este projeto é licenciado sob os termos da Licença MIT – consulte o arquivo LICENSE para obter detalhes.

    Autor

    Gabriel Alves
    Gabriel Moises Alves
    Visit original content creator repository https://github.com/gabrielmoisesa/challenge-ibge-news