Blog

  • hotels-searcer-app

    Hotels searher app

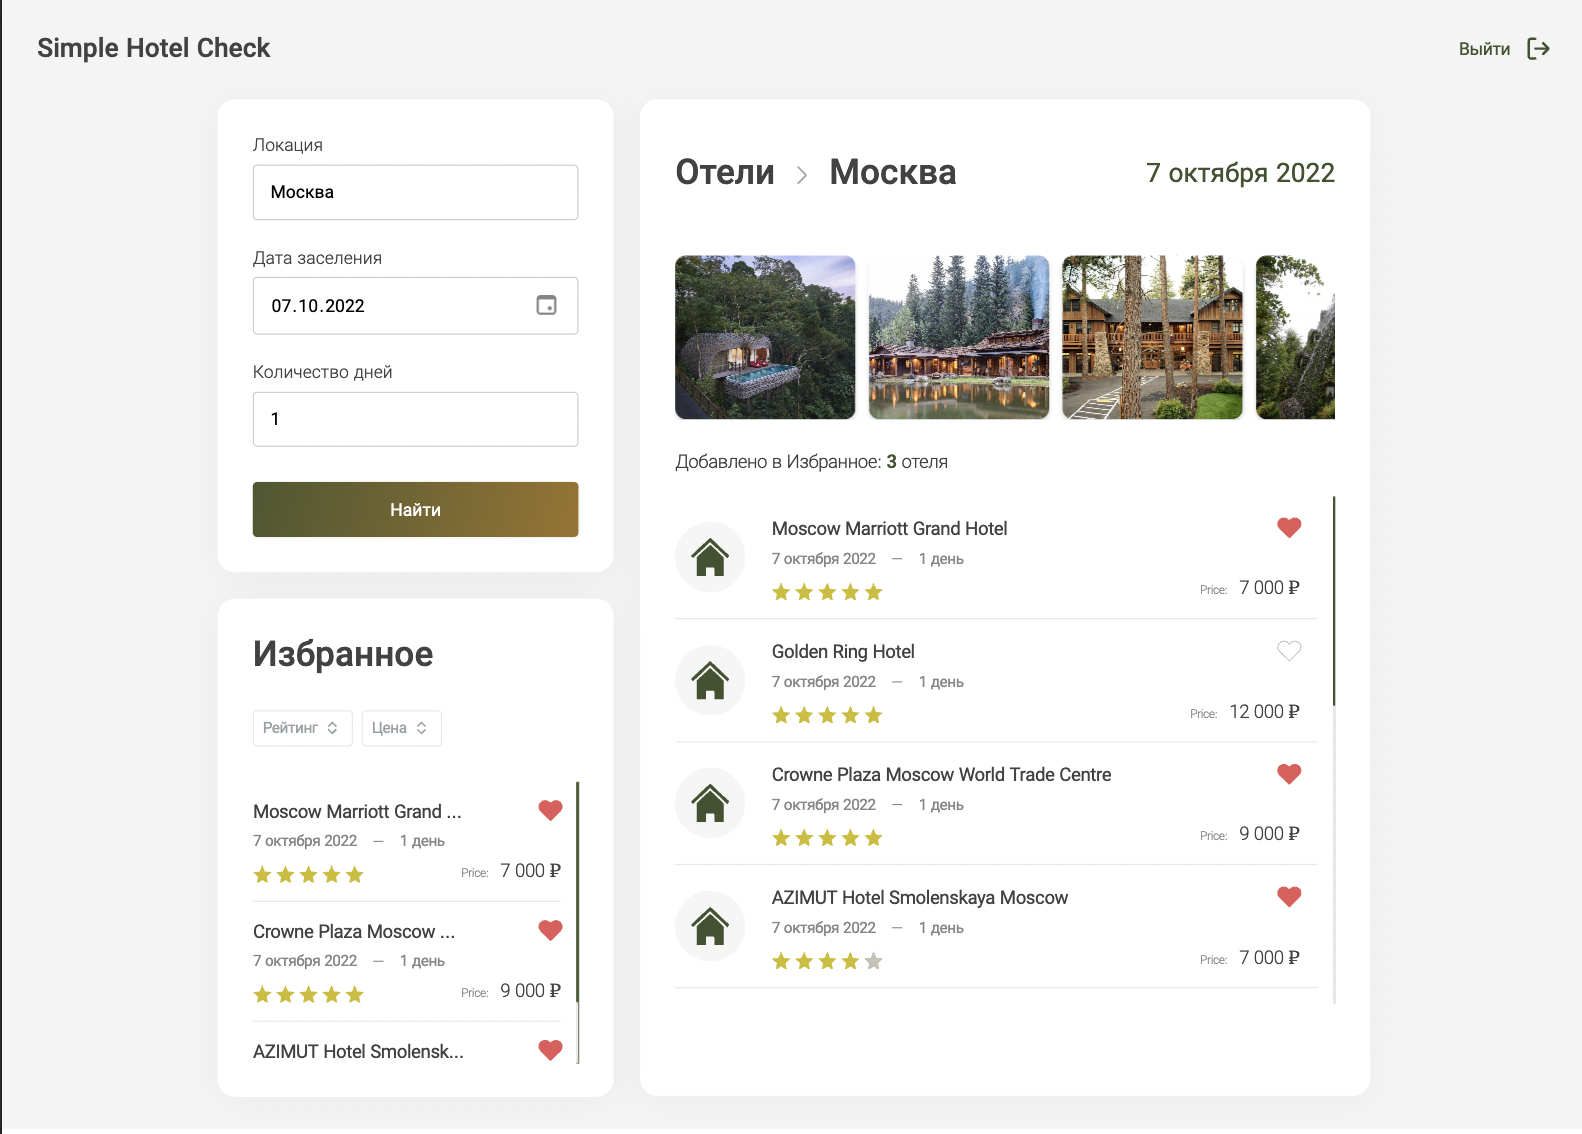
    Поисковик отелей через Travelpayouts API


    Посмотреть деплой


    Экосистема

    • JS ES6
    • React SPA, react-router-dom v6
    • redux, react-redux, redux-toolkit, Saga, redux-persist, LocalStorage – стейт-менеджмент и кеширование данных
    • formik – валидация полей
    • react-datepicker – кастомный дейтпикер для выбора дат
    • date-fns – локализация дейтпикера
    • swiper – свайпер картинок
    • uniqid – для уникальных айди
    • sass, classnames – стили: переменные, миксины, вложенность и переиспользование стилей
    • ESlint – линтинг
    • Vercel – деплой

    Какие задачи сделал:

    • Вход по логину-паролю с валидацией полей
    • Кеширование состояния пользователя в localstorage
    • Получение отелей по API из формы (город, дата, дни)
    • Отрисовка списков найденных / избранных отелей
    • Сохранение в избранное / удаление отелей
    • Сортировка по цене, по рейтингу избранных отелей
    • Анимации блоков с меняющейся шириной
    • UI-состояния: hover, active, disabled и т.д.
    • Адаптивная верстка с flex
    • Кастомные utils для работы с датами и склонениями слов
    • Кастомный хук для получения размеров доступного экрана

    Подробнее:

    Роутинг

    • 3 страницы: Login, Hotels, ErrorPage
    • Hotels – protected route: lдоступ только после логина

    Формы

    • Валидация формы логина через Formik
    • Логин – любая почта
    • Пароль – без кириллицы, минимум 8 символов
    • Кнопка submit: disabled, если поля невалидны
    • Кастомный datepicker

    Redux Store

    • Разбит на логические слайсы
    • Асинхронные запросы к API через saga
    • Стейт логина кешируется в LocalStorage

    Обработка асинхронных состояний запросов к серверу

    • Состояние до запроса – выводом полей “нет данных” в блоки
    • Состояние ожидания – через попап и спиннер
    • Состояние ошибки – через попап с выводом ошибки

    Верстка

    • Адаптивная верстка 320px => 1440px
    • Резиновые размеры шрифтов
    • Раскрытие блоков по кнопке на планшетных и мобильных разрешениях
    • Состояния hover и active у UI-компонентов
    • Анимации блоков с изменяющейся шириной (блоки “избранное” и “найденные отели”)
    • Блоки с ограничениями по высоте и скроллбарами

    Reference

    Команды:

    • clone branch with git@github.com:proehavshiy/google-books-searcher.git
    • npm run build – build final version
    • npm run start – start dev mode
    Visit original content creator repository https://github.com/proehavshiy/hotels-searcer-app
  • pgf-cmykshadings

    pgf-cmykshadings — Support for CMYK and grayscale shadings in PGF/TikZ

    The pgf-cmykshadings package provides support for CMYK and grayscale shadings
    for the pgf package. By default pgf only supports RGB shadings.
    pgf-cmykshadings attempts to produce shadings consistent with the currently
    selected xcolor colour model. The rgb, cmyk, and gray colour models
    from the xcolor package are supported.

    Installation from TeXLive or MiKTeX

    pgf-cmykshadings is in TeXLive and MiKTeX and can be installed in the usual
    way through your distribution. e.g., in TeXLive by running:

    tlmgr install pgf-cmykshadings
    

    Installation from CTAN

    Download and unpack pgf-cmykshadings.zip from CTAN at
    https://ctan.org/pkg/pgf-cmykshadings

    Change to the pgf-cmykshadings directory, then run:

    tex pgf-cmykshadings.ins
    

    to generate the style file (pgf-cmykshadigns.sty) and driver files
    (pgfsys-cmykshadings-*.def).

    Copy these generated files to $TEXMFHOME/tex/latex/pgf-cmykshadings/ and
    pgf-cmykshadings.pdf to $TEXMFHOME/doc/latex/pgf-cmykshadings/.

    You can find $TEXMFHOME by running:

    kpsewhich -var-value=TEXMFHOME
    

    Installation from Git Source

    pgf-cmykshadings uses the l3build system.

    Clone the git repository using:

    git clone https://github.com/dcpurton/pgf-cmykshadings.git
    

    Change to the pgf-cmykshadings directory, and then the package and
    documentation can be installed by running:

    l3build install --full
    

    Licence

    Copyright (c) 2018 David Purton <dcpurton@marshwiggle.net>
    
    This work may be distributed and/or modified under the conditions of
    the LaTeX Project Public License, either version 1.3c of this license
    or (at your option) any later version. The latest version of this
    license is in
       http://www.latex-project.org/lppl.txt
    and version 1.3c or later is part of all distributions of LaTeX
    version 2005/12/01 or later.
    
    This work is "maintained" (as per the LPPL maintenance status)
    by David Purton.
    
    This work consists of the files pgf-cmykshadings.ins,
    pgf-cmykshadings.dtx, README.md, and the derived files
      - pgf-cmykshadings.sty
      - pgfsys-cmykshadings-pdftex.def
      - pgfsys-cmykshadings-xetex.def
      - pgfsys-cmykshadings-luatex.def
      - pgfsys-cmykshadings-dvipdfmx.def
      - pgfsys-cmykshadings-dvipdfm.def
      - pgfsys-cmykshadings-dvips.def
      - pgfsys-cmykshadings-textures.def
      - pgfsys-cmykshadings-vtex.def
      - pgfsys-cmykshadings-common-postscript.def
      - pgf-cmykshadings.pdf
    
    
    Substantial parts of the code for this package are taken from the pgf package
    file pgfcoreshade.code.tex, along with the driver files pgfsys-*.def, copyright
    (c) 2006 Till Tantau and then slightly modified to support CMYK and grayscale
    shadings.
    

    Visit original content creator repository
    https://github.com/dcpurton/pgf-cmykshadings

  • Walmartify

    Walmartify

    About

    Walmartify is a robust back-end program, accessible via the command prompt, designed to streamline the collection of item price data from local Walmart stores. This data is retrieved based on user-specified search criteria and proximity to their location. The program organizes this information, allowing users to export it into spreadsheets for analysis. Whether you’re a business owner, researcher, or analyst, Walmartify simplifies the task of gathering and managing essential pricing data from local Walmart stores.

    Purpose

    The purpose of Walmartify is to offer users a visualization of item prices across Walmart stores located within a set radius. This information is presented in a standardized spreadsheet format, helping users to make well-informed purchasing decisions based on price variations across different store locations. In addition to price data, Walmartify also highlights product availability at various stores, ensuring users can easily locate the items they need. Walmart recently removed the search-by-store feature, making Walmartify even more valuable as it retrieves and presents prices and product availability across multiple nearby stores.

    Features

    • Automatically generates spreadsheets for multiple searches, simplifying data organization
    • Terminal-based interface for streamlined execution and ease of use.
    • TomTom API finds store proximity data for accurate results.
    • clean data visualization for ease of analysis.

    Video Showcase

    Requirements

    • Python (See requirements.txt for packages)
    • Python Interpreter
    • Network Connection
    • Terminal
    • Program to view .xslx files (Google Spreadsheets recommended)

    Installation and Usage

    1. Download the repository and extract its contents.
    2. To install the required packages, navigate to the ‘Walmartify/’ directory in your terminal and execute the command: pip install -r requirements.txt.
    3. Navigate to the directory where the program is installed, for example, using the command: cd Path/To/Folder/Walmartify/Walmart_Application.
    4. Run the program by executing the command: python Walmartify.py.
    5. The program will execute and display an input message indicating how to proceed. Logo
    6. Either enter one of the listed commands or continue by specifying a product.
    7. The results, which will be stored in the ‘products’ folder located in the user’s ‘Documents’ directory. Logo
    8. Open the generated files for analysis using your preferred .xlsx viewer.

    Technology

    Python

    • Serves as the framework for developing the Walmartify application, and for capturing and processing API data.

    TomTom API

    • A cost-effective alternative to the Google Maps API, enabling precise location-based searches for Walmart stores.

    PostMan

    • tool employed to make custom API calls to Walmart’s services. This approach is designed to circumvent bot flase-positives.

    Future and Contributions

    The program is finalized and open-source, contributions for further enhancements and features are welcome.

    Visit original content creator repository https://github.com/ManjotSingh18/Walmartify
  • wormhole

    Visit original content creator repository
    https://github.com/rymdport/wormhole

  • mpesa-node-library

    Node.js M-Pesa API

    M-Pesa Library for Node.js using REST API

    Node Mpesa Rest API

    JavaScript Standard Style Build Status Made in Africa Known Vulnerabilities

    Prerequisites

    1. Node v6+, 8+ recommended.
    2. Yarn* (optional) You can still use npm
    3. ES6 knowledge

    Installation

    Use npm/yarn:

    npm i mpesa-node
    

    Pre-Usage

    Please make sure you have read the documentation on Daraja before continuing.

    You need the following before getting to use this library:

    1. Consumer Key and Consume Secret
    2. Test Credentials (Optional only for sandbox)

    Getting Started

    This library is extremely modular, meaning you can create more than one Mpesa instance

    const Mpesa = require('mpesa-node')
    const mpesaApi = new Mpesa({ consumerKey: '<your consumer key>', consumerSecret: '<your consumer secret>' })
    // another instance
    // const instance = new Mpesa({ consumerKey: 'test', consumerSecret: 'test', environment: 'production' })
    mpesaApi
        .c2bSimulate(
            254708374149,
            500,
            'h6dk0Ue2'
        )
        .then((result) => {
            //do something
        })
        .catch((err) => {
            // retry?
        })

    While working with the Mpesa Class, you only need two key-value items, ie: consumerKey and consumerSecret. Nonetheless, prefilling some things means you dont have to re-enter them again. A complete config object looks like this

    new Mpesa({
        consumerKey: '<your consumer key>',
        consumerSecret: '<your consumer secret>',
        environment: 'sandbox',
        shortCode: '600111',
        initiatorName: 'Test Initiator',
        lipaNaMpesaShortCode: 123456,
        lipaNaMpesaShortPass: '<some key here>',
        securityCredential: '<credential here>',
        certPath: path.resolve('keys/myKey.cert')
    })

    API

    Please note that this library is in active development, use in production with caution.

    Current API:

    const mpesaApi = new Mpesa({ consumerKey: '<your consumer key>', consumerSecret: '<your consumer secret>' })
    const {
      accountBalance,
      b2b,
      b2c,
      c2bRegister,
      c2bSimulate,
      lipaNaMpesaOnline,
      lipaNaMpesaQuery,
      reversal,
      transactionStatus
    } = mpesaApi

    Ofcourse you dont need to import all methods, you can import the only ones you need.

    All methods return a <Promise>, hence you can use .then or await. All calls are done by Axios, so for the response structure check Axios documentation.

    Methods

    B2C Request

    This initiates a business to customer transactions from a company (shortcode) to end users (mobile numbers) of their services.

    /*
     * b2c(senderParty, receiverParty, amount, queueUrl, resultUrl, commandId = 'BusinessPayment', initiatorName = null, remarks = 'B2C Payment', occasion = null)
     * Example:
    */
    const { shortCode } = mpesaApi.configs
    const testMSISDN = 254708374149
    await mpesaApi.b2c(shortCode, testMSISDN, 100, URL + '/b2c/timeout', URL + '/b2c/success')

    B2B Request

    This initiates a business to business transaction between one company to another.

    /*
     * b2c(senderParty, receiverParty, amount, queueUrl, resultUrl, senderType = 4, receiverType = 4, initiator = null, commandId = 'BusinessToBusinessTransfer', accountRef = null, remarks = 'B2B Request')
     * Example:
    */
    const { shortCode } = mpesaApi.configs
    const testShortcode2 = 600000
    await mpesaApi.b2b(shortCode, testShortcode2, 100, URL + '/b2b/timeout', URL + '/b2b/success')

    C2B Register

    This initiates a C2B confirmation and validation registration for a company’s URLs

    /*
     * c2bRegister(confirmationUrl, validationUrl, shortCode = null, responseType = 'Completed')
     * Example:
     */
    
    await mpesaApi.c2bRegister(URL + '/c2b/validation', URL + '/c2b/success')

    C2B Simulate

    This initiates a C2B transaction between an end-user and a company (paybill or till number)

    /*
     * c2bSimulate(msisdn, amount, billRefNumber, commandId = 'CustomerPayBillOnline', shortCode = null)
     * Example:
     */
    const testMSISDN = 254708374149
    await mPesa.c2bSimulate(testMSISDN, 100, Math.random().toString(35).substr(2, 7))

    M-Pesa Express Request – Lipa Na M-Pesa Online Payment API

    This initiates a Lipa Na M-Pesa Online Payment transaction using STK Push.

    /*
     * lipaNaMpesaOnline(senderMsisdn, amount, callbackUrl, accountRef, transactionDesc = 'Lipa na mpesa online', transactionType = 'CustomerPayBillOnline', shortCode = null, passKey = null)
     * Example:
     */
     const testMSISDN = 254708374149
     const amount = 100
     const accountRef = Math.random().toString(35).substr(2, 7)
    await mpesaApi.lipaNaMpesaOnline(testMSISDN, amount, URL + '/lipanampesa/success', accountRef)

    M-Pesa Express Query Request – Lipa Na M-Pesa Query Request API

    This API checks the status of a Lipa Na M-Pesa Online Payment transaction

    /*
     * lipaNaMpesaQuery(checkoutRequestId, shortCode = null, passKey = null)
     * Example:
     */
    const checkoutRequestId ='ws_co_123456789'
    await mpesaApi.lipaNaMpesaQuery(checkoutRequestId)

    Reversal Request

    This initiates an M-Pesa transaction reversal on B2B, B2C or C2B API

    /*
     * reversal(transactionId, amount, queueUrl, resultUrl, shortCode = null, remarks = 'Reversal', occasion = 'Reversal', initiator = null, receiverIdType = '11', commandId = 'TransactionReversal')
     * Example:
     */
    await mpesaApi.reversal('LKXXXX1234', 100, URL + '/reversal/timeout', URL + '/reversal/success')

    Transaction Status Request

    This API is used to check the status of B2B, B2C and C2B transactions

    /*
     * transactionStatus(transactionId, receiverParty, idType, queueUrl, resultUrl, remarks = 'TransactionReversal', occasion = 'TransactionReversal', initiator = null, commandId = 'TransactionStatusQuery')
     * Example:
     */
    await mpesaApi.transactionStatus('LKXXXX1234', shortCode, 4, URL + '/transactionstatus/timeout', URL + '/transactionstatus/success')

    Account Balance Request

    This initiates a request for the account balance of a shortcode

    /*
     * accountBalance(shortCode, idType, queueUrl, resultUrl, remarks = 'Checking account balance', initiator = null, commandId = 'AccountBalance')
     * Example:
     */
    const { shortCode } = mpesaApi.configs
    await mpesaApi.accountBalance(shortCode, 4, URL + '/accountbalance/timeout', URL + '/accountbalance/success')

    Testing

    Testing needs you to clone this repo.

    The command below runs both integration and unit test.

    Integration tests launch a ngrok instance and await callbacks (you will need an active internet connection for this).

    To run each separately, check package.json for the commands.

    npm test
    

    Going Live/Production

    You will need to first click on “Going Live” on Daraja

    The only thing you need to tweek in this Libs config is environment:

    new Mpesa({
        consumerKey: '<your consumer key>',
        consumerSecret: '<your consumer secret>',
        environment: 'production', //<------
        .....
        })

    Pending Stuff

    • E2E Integration Tests
    • Deploy to Npm
    • Reduce number of args
    • Detailed Documentation
    • Enumify
    • Validators for MSISDN and other expected inputs
    • More detailed Unit tests
    • Handle all Promises

    Contributing

    1. Create your feature branch: git checkout -b my-new-feature
    2. Commit your changes: git commit -m 'Add some feature'
    3. Push to the branch: git push origin my-new-feature
    4. Submit a pull request 😀

    Credits

    | Contributor |
    | DGatere |
    | geofmureithi |

    License

    MIT

    Visit original content creator repository https://github.com/safaricom/mpesa-node-library
  • Nidhogg

    Nidhogg

    Logo

    image image

    Nidhogg is a multi-functional rootkit to showcase the variety of operations that can be done from kernel space. The goal of Nidhogg is to provide an all-in-one and easy-to-use rootkit with multiple helpful functionalities for operations. Besides that, it can also easily be integrated with your C2 framework.

    Nidhogg can work on any version of x64 Windows 10 and Windows 11.

    This repository contains a kernel driver with a C++ program to communicate with it.

    If you want to know more, check out the wiki for a detailed explanation.

    Current Features

    Important

    All the features have been fully tested up to Windows 11 22H2 and are gradually tested against 24H2. If you encounter a problem, please open an issue after checking there isn’t already an open issue.

    • Process hiding and unhiding
    • Process elevation
    • Process protection (anti-kill and dumping)
    • Bypass pe-sieve
    • Thread hiding and unhiding
    • Thread protection (anti-kill)
    • File protection (anti-deletion and overwriting)
    • Registry keys and values protection (anti-deletion and overwriting)
    • Registry keys and values hiding
    • Querying currently protected processes, threads, files, hidden ports, registry keys and values
    • Function patching
    • Built-in AMSI bypass
    • Built-in ETW patch
    • Process signature (PP/PPL) modification
    • Can be reflectively loaded
    • Shellcode Injection
      • APC
      • NtCreateThreadEx
    • DLL Injection
      • APC
      • NtCreateThreadEx
    • Querying kernel callbacks
      • ObCallbacks
      • Process and thread creation routines
      • Image loading routines
      • Registry callbacks
    • Removing and restoring kernel callbacks
    • ETWTI tampering
    • Module hiding
    • Driver hiding and unhiding
    • Credential Dumping
    • Port hiding/unhiding
    • Script execution
    • Initial operations

    Reflective loading

    Since version v0.3, Nidhogg can be reflectively loaded with kdmapper but because PatchGuard will be automatically triggered if the driver registers callbacks, Nidhogg will not register any callback. Meaning, that if you are loading the driver reflectively these features will be disabled by default:

    • Process protection
    • Thread protection
    • Registry operations

    Script Execution

    Since version v1.0, Nidhogg can execute NidhoggScripts – a tool that allows one to execute a couple of commands one after another, thus, creating playbooks for Nidhogg. To see how to write one check out the wiki

    Initial Operations

    Since version v1.0, Nidhogg can execute NidhoggScripts as initial operations as well. Meaning, that if it spots the file out.ndhg in the root of the project directory (the same directory as the Python file) it will execute the file each time the driver is running.

    PatchGuard triggering features

    These are the features known to trigger PatchGuard, you can still use them at your own risk.

    • Process hiding
    • File protecting

    Basic Usage

    To see the available commands you can run NidhoggClient.exe or look at the wiki for detailed information regarding how to use each command, the parameters it takes and how it works.

    NidhoggClient.exe
    
    # Simple usage: Hiding a process
    NidhoggClient.exe process hide 3110

    Setup

    Building the client

    To compile the client, you will need to have Visual Studio 2022 installed and then just build the project like any other Visual Studio project.

    Building the driver

    To compile the project, you will need the following tools:

    Clone the repository and build the driver.

    Driver Testing

    To test it in your testing environment run those commands with elevated cmd:

    bcdedit /set testsigning on

    After rebooting, create a service and run the driver:

    sc create nidhogg type= kernel binPath= C:\Path\To\Driver\Nidhogg.sys
    sc start nidhogg

    Debugging

    To debug the driver in your testing environment run this command with elevated cmd and reboot your computer:

    bcdedit /debug on

    After the reboot, you can see the debugging messages in tools such as DebugView.

    Resources

    Contributions

    Thanks a lot to those people who contributed to this project:

    Visit original content creator repository https://github.com/Idov31/Nidhogg
  • club-gamma-frontend

    🎉 Contribution Guidelines 🚀

    Welcome, Rockstars! 🤘🎸 We’re super excited that you want to contribute to the Club Gamma Project! 🦸‍♂️💻 Whether you’re an open-source newbie or a seasoned coder, your magic 🪄 matters. Ready to dive in? Let’s create something awesome together! 🚀💥

    🔥 General Rules to Rock by 🎧

    • Creativity FTW! 💡: Rules are meant to be bent, twisted, and morphed. Go wild! If you’ve got something out of the box 🛸, break the rules, and we might still merge it. (Yeah, we’re cool like that 😎).

    • 💾 Protect the Sacred Code: Thou shalt not delete any existing content. Add your flair without erasing history. 🔐

    • 🌀 Code Style? Do YOU: Whether your code is a spotless masterpiece 🎨 or a chaotic explosion 🌪️ of genius, as long as it works, it works! No judgment here. 😏

    • Tiny but Mighty PRs 🧚‍♀️: Small pull requests = 💨 faster merges. Minimize conflicts and make life easier for everyone. Let’s keep it swift!

    🚀 Getting Started – Let’s Get This Party Started! 🥳

    Alright, you’re in? Here’s how to get rolling! 🎱

    1. 🍴 Fork it Like it’s Hot:

      • Hit that shiny fork button at the top right of the repository page and boom! You’ve got your own copy. 🎉
    2. 👯‍♂️ Clone Your Epic Fork:

      • Clone that bad boy down to your local machine, and you’re halfway to awesome.
      git clone https://github.com/YOUR-USERNAME/club-gamma-frontend.git
    3. 🧭 Navigate to Your Playground:

      cd club-gamma-frontend
    4. 🧪 Create a Funky New Branch:

      • New branch = your sandbox. Go nuts!
      git checkout -b funky-branch-name
    5. 🎨 Make Your Magic:

      • Code, tweak, break, fix, repeat!
      git add .
    6. 🔑 Commit Like a Boss:

      git commit -m "Adding coolness to the project 🎉"
    7. 💥 Push it Real Good:

      git push origin funky-branch-name
    8. 🏆 Time to Shine – Create a Pull Request!

      • Head over to your forked repo and create a pull request! 🚀🎉 Let’s see that PR flow!

    🚨 Avoiding Conflicts – Keep Your Fork as Fresh as Your Beats 🎶

    Let’s keep things smooth by staying in sync with the main repo, yeah? 🤘

    1. 🛠️ Add the Main Repo as Your Upstream:

      git remote add upstream https://github.com/clubgamma/club-gamma-frontend.git
    2. 🧐 Verify You Nailed It:

      git remote -v
    3. 🔄 Sync It Up:

      • Fetch the latest changes from the mothership 🛸 and merge them into your fork. No conflicts, no drama. 💼

      git fetch upstream
      git merge upstream/main
    4. 🚨 Stay Updated, Stay Cool:

      • Pull regularly to keep your fork fresh and aligned with the upstream repo. Trust us, your future self will thank you. 😎

    🎉 Let’s Build Something Legendary! 🦸‍♀️💥

    We’re stoked to have you here, and we can’t wait to see what you bring to the table! Whether it’s a small tweak or a big feature, you’re contributing to something EPIC. 💥🤘

    🤝 Thank you for being part of this awesome community. Let’s make this project rock together! 🤘🔥💻

    — Team Club Gamma 💻🎉

    Visit original content creator repository
    https://github.com/clubgamma/club-gamma-frontend

  • ember-cli-simple-auth-token

    Visit original content creator repository
    https://github.com/tibotiber/ember-cli-simple-auth-token

  • meteor-jalik-mailer

    jalik-mailer

    Mailer is a Meteor package that provides a simple way to send emails using a prioritized queue system. It was built to never miss an email sending even if the server is restarted.

    Donate

    Installation

    To install the package, execute this command in the root of your project :

    meteor add jalik:mailer
    

    If later you want to remove the package :

    meteor remove jalik:mailer
    

    Configuration

    All settings are accessible from the Mailer.config object which is an instance of MailerConfig with default settings.

    import {Mailer} from 'meteor/jalik:mailer';
    
    // default from address to use
    Mailer.config.from = 'me@mail.com';
    // send emails asynchronously
    Mailer.config.async = true;
    // send emails every 60 seconds
    Mailer.config.interval = 1000 * 60;
    // send max 5 emails per task (in this example a task is run every 60 seconds) /  (0 to disable)
    Mailer.config.maxEmailsPerTask = 5;
    // max time before considering that a sending email has failed
    Mailer.config.maxSendingTime = 1000 * 30;
    // default priority (ex= 1 is more important than 5)
    Mailer.config.priority = 2;
    // Send email when service starts
    Mailer.config.processOnStart = true;
    // number of time to retry when email sending failed (0 to disable)
    Mailer.config.retry = 1;
    // web hook path used to mark emails as read
    Mailer.config.webHook = 'mailer';

    Starting the service

    To start the mail service, use Mailer.start().

    import {Mailer} from 'meteor/jalik:mailer';
    import {Meteor} from 'meteor/meteor';
    
    if (Meteor.isServer) {
        Meteor.startup(function () {
            Mailer.start();
        });
    }

    Stopping the service

    To stop the mail service, use Mailer.stop().

    import {Mailer} from 'meteor/jalik:mailer';
    import {Meteor} from 'meteor/meteor';
    
    if (Meteor.isServer) {
        Meteor.startup(function () {
            Mailer.start();
            //...
            Mailer.stop();
        });
    }

    Restarting the service

    To restart the mail service, use Mailer.restart().

    import {Mailer} from 'meteor/jalik:mailer';
    import {Meteor} from 'meteor/meteor';
    
    if (Meteor.isServer) {
        Meteor.startup(function () {
            Mailer.start();
            //...
            Mailer.restart();
        });
    }

    Sending emails

    To send an email, use Mailer.send(email), the content of the email can be raw text if you pass the text option and/or HTML if you pass html. The email object is the same as in the Meteor documentation : https://docs.meteor.com/api/email.html since Mailer is a smart version of the Email package. Sending an email will put it in the queue and send it just after.

    import {Mailer} from 'meteor/jalik:mailer';
    
    Mailer.send({
        from: 'test@mailer.com',
        bcc: ['bcc@example.com'],
        cc: ['cc1@example.com','cc2@example.com'],
        to: 'you@example.com',
        subject: 'Test email',
        text: "Mailer Test",
        html: "<h1>Mailer Test</h1>",
        // Optional: tells the mailer when to send the email
        sendAt: new Date(Date.now() + 1000*60*60)
    });

    Adding emails to queue

    To send an email that is not urgent, use Mailer.queue(email). You can manage the order of the queue by setting the priority (ex: 0 will be sent before 99).

    import {Mailer} from 'meteor/jalik:mailer';
    
    Mailer.queue({
        from: 'test@mailer.com',
        to: 'you@example.com',
        subject: 'Test email',
        text: "Mailer Test",
        // Optional: this tells the mailer to send this email before emails with priority more than 2
        priority: 2
    });

    Handling errors

    Sometimes errors can happen, in that case the Mailer will simply change the status of the email to failed and will retry to send it on the next execution. But if you want to do more things you can overwrite the Mailer.onError callback.

    import {Mailer} from 'meteor/jalik:mailer';
    
    Mailer.onError = function(err, emailId) {
        console.error(err);
    };

    Handling events

    You can hook to mailer events by using the following methods.

    import {Mailer} from 'meteor/jalik:mailer';
    
    Mailer.onEmailDelayed = function(emailId, email) {
        console.log(`The email ${emailId} has been delayed`);
    };
    Mailer.onEmailFailed = function(emailId, email) {
        console.log(`The email ${emailId} has failed sending`);
    };
    Mailer.onEmailQueued = function(emailId, email) {
        console.log(`The email ${emailId} has been added to queue`);
    };
    Mailer.onEmailRead = function(emailId, httpRequest) {
        console.log(`The email ${emailId} has been read`);
    };
    Mailer.onEmailSent = function(emailId, email) {
        console.log(`The email ${emailId} has been sent`);
    };
    Mailer.onSend = function(emailId, email) {
        console.log(`Sending email ${emailId}`);
    };

    Fetching emails

    All emails are stored in a Mongo.Collection, accessible in Mailer.emails.

    let count = 0;
    
    import {Mailer} from 'meteor/jalik:mailer';
    count = Mailer.emails.find({status: Mailer.status.PENDING}).count();
    // OR
    import {Emails} from 'meteor/jalik:mailer';
    count = Emails.find({status: Mailer.status.PENDING}).count();

    Email status

    Each email have a status attribute that can be one of the following :

    • pending : the email has been added to the queue and is waiting to be sent
    • canceled : the email has been canceled
    • failed : an error occurred while sending the email, it will be sent on the next execution
    • delayed : the email will be sent on the next execution because it took too much time to be sent
    • sending : the email is currently sending
    • sent : the email has been sent
    • read : the email has been read (note that it works only with html emails using an embedded img tag)

    NOTE: statuses are available through Mailer.status.

    Changelog

    v0.4.0

    WARNING, there are breaking changes in this version, please see below.

    • Deprecates method Mailer.getReadLink(), use instead Mailer.getReadUrl()
    • Deprecates method Mailer.sendEmail(), use instead Mailer.processEmail()
    • Renames class Mailer.Config to MailerConfig

    These are the new things :

    • Uses ES6 module import and export syntax
    • Adds Mailer.status containing all email statuses
    • Adds config Mailer.config.processOnStart = true to send emails when service starts
    • Adds method Mailer.cancelEmail(emailId)
    • Adds method Mailer.checkEmail(email)
    • Adds method Mailer.getReadPath(emailId, redirect)
    • Adds method Mailer.getReadUrl(emailId, redirect)
    • Adds method Mailer.isStarted()
    • Adds method Mailer.onStarted(callback)
    • Adds method Mailer.onStopped(callback)
    • Adds method Mailer.processEmail()
    • Adds method Mailer.replaceLinks(content, emailId)
    • Adds method Mailer.restart()
    • Adds method Mailer.stop()
    • Adds unit tests
    • Throws more detailed errors

    License

    This project is released under the MIT License.

    Visit original content creator repository https://github.com/jalik/meteor-jalik-mailer