An integration for the Ministry of Attorney General, Road Safety BC. This application sits between Case and Records Management Application(CARMA), and Vehicle Impound and Prohibition System(VIPS).
Integration details
This integration captures a secure REST requests from VIPS, and passes it along to CARMA if the payload is validated, and the multi-layered authentication and authorization passes.
nodejs – Production uses v10, ensure compatibility from your local environment.
Getting started
Starting to install this packages dependencies
# Download and open the source code to your local machine
git clone git@github.com:bcgov/jag-rsbc-carma.git
cd jag-rsbc-carma

# Install yarn if not already available
npm install -g yarn

# Install package dependencies
yarn install

# Test that all packages are pulled by seeing all tests pass
yarn test
To run the application locally,
# Following the steps above.# Populate the .env file with you required variable values# Start the application
yarn start
Now that the application is running, you may use your flavour of development tools to exercise the application. Some recommendations are VSCode to update and maintain the code, and Postman to exercise REST endpoints.
Logging
Splunk is integrated for runtime logging, as interoperable system to track and view application execution.
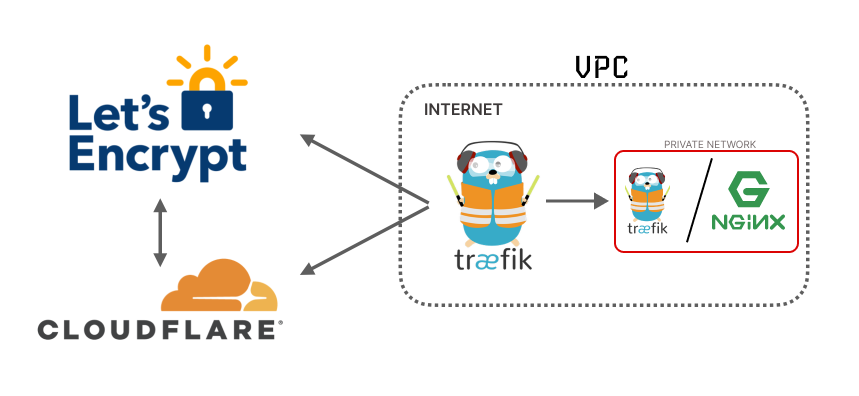
Docker Compose Traefik – Proxy Container Service (Cloudflare)
This guide shows you how to deploy your containers behind Traefik reverse-proxy. It will obtain and refresh HTTPS certificates automatically and it comes with password-protected Traefik dashboard.
You can paste the username into the TRAEFIK_BASIC_AUTH_USERNAME environment variable. The other part, hashedPassword, should be assigned to TRAEFIK_BASIC_AUTH_PASSWORD_HASH. Now you have your own username:password pair.
Step 5: Launch Your Deployment
Optional create docker network net-proxy for external used with other docker containers:
Traefik requires you to define “Certificate Resolvers” in the static configuration, which are responsible for retrieving certificates from an ACME server.
Then, each “router” is configured to enable TLS, and is associated to a certificate resolver through the tls.certresolver configuration option.
Here is a list of supported providers, on this project:
Cloudflare
Let’s say you have a domain example.com and it’s DNS records point to your production server. Just repeat the local deployment steps, but don’t forget to update TRAEFIK_DOMAIN_NAME, TRAEFIK_ACME_DNS_CHALLENGE_PROVIDER_EMAIL & TRAEFIK_ACME_DNS_CHALLENGE_PROVIDER_TOKEN environment variables. In case of example.com, your src/.env file should have the following lines:
Setting correct email is important because it allows Let’s Encrypt to contact you in case there are any present and future issues with your certificates.
Redirect WWW to NON WWW external services (other docker compose file)
Example labels redirect www to npn www:
labels:
- traefik.enable=true
- traefil.docker.network=net-proxy
- traefik.http.routers.whoami.entrypoints=https
- traefik.http.routers.whoami.rule=Host(`jogjascript.com`)||Host(`www.jogjascript.com`)# Add redirect middlewares for http and https
- traefik.http.routers.whoami.middlewares=redirect-http-www@file,redirect-https-www@file
Also included is an option that allows only TLS v1.3. This option must be manually configured. There is an example below on how to do this with a docker label.
To import staking data in readable format and saves as csv that can be imported by cointracking.info. It complements normal Ethereum blockchain import.
Prerequisites
Install Python 3.9
Get Infura API key
Install packages. You can use virtual pipenv environment, e.g:
timezone name – timezone used for csv generation. If not provided it will be local timezone. Match it with timezone from CoinTracking account seetings if you are not at home. Possible examples: US/Pacific, Canada/Pacific, Europe/Berlin)
exchange name – name of the exchange staking transactions – default is HEX Stake
It will print out stake data in the terminal and generate a csv file with the following columns:
"Type","Buy","Cur.","Sell","Cur.","Fee","Cur.","Exchange","Group","Comment","Date"
This repository provides a small simulation environment based a four wheel model of a car and a Pacejka tire model. It also contains the implementation of a PID controller for constant longitudinal speed tracking and a Pure Pursuit controller for the lateral control of the car, using the steering angle.
Accessing the Configuration File
The configuration file for the PID and Pure Pursuit controllers can be found at:
src/CONTROLLER_PARAMS.py
Understanding the Controllers
PID Controller: A Proportional-Integral-Derivative (PID) controller uses three terms to adjust the control output:
Proportional: Reacts to current error.
Integral: Reacts to the accumulation of past errors.
Derivative: Reacts to the rate of change of the error.
Pure Pursuit Controller: This controller follows a path by calculating the steering angle needed to reach a target point on the path ahead of the car, allowing for smoother turns and better trajectory tracking.
Getting Started
Prerequisites
Before running the code, ensure you have the following:
Clone the Repository
git clone https://github.com/your-repo/Duckietown-Activity.git
cd Duckietown-Activity
Install Requirements Install the necessary packages from requirements.txt. You may want to verify compatibility based on your environment:
pip install -r requirements.txt
Edit Controller Parameters Modify the controller parameters in:
src/CONTROLLER_PARAMS.py
Run the Simulation Execute the simulation to visualize the controller’s performance:
NB scruss is not the author or maintainer of these files (same goes for seamusdemora, who assumed maintenance of this repo from scruss). Please take up any issues or questions in the Image File Utilities thread of the Raspberry Pi Forums site. IOW: This is a file repository only; no support is available here.
Files here are a toolset to create and update a backup of a running RPi OS to a raw image file. The files are copies of those posted on the Raspberry Pi Forums site. The file attachments in that forum don’t seem to be persistent (and are subject to other annoyances imposed by CloudFlare). Consequently, this repo was created by user scruss and is now maintained by seamus, to ensure a current working copy of image-utils is always available through git.
An Overview
I’ve used RonR’s image-utils for several years now, and I’ve become a big fan. Image-utils creates a complete backup of a Raspberry Pi quickly and efficiently; these backups are rendered in the form of an “image file”. The *.img format is ideal as a backup because it’s a complete backup, it’s portable, and it can be loop-mounted. In other words: If your system or SD card or NVME drive becomes corrupted, it can be restored to operation with minimal effort. This restoration requires 3 “ingredients”, and about 5 minutes:
The raw image backup file (*.img) file – created by image-backup
A micro SD card (or NVME drive)
Etcher to write the .img file to the micro-SD card (or NVME drive)
The speed and efficiency of image-backup are especially noteworthy. Because image-backup uses rsync for file copying and syncing, a backup requires only the storage space that is actually used by your system. This is not the same as dd:
dd has no way to tell which portions of your drive/SD card are being used versus which portions are not, becausedd has no concept of a file. Consequently, a dd backup of a 32 GB SD card requires: …32GB!!
Because of this fundamental limitation, dd is “v-e-r-y s-l-o-w”, and inefficient of space utilization.
By comparison, image-backup typically requires a small fraction of the time required for a dd backup, and the image occupies a small fraction of the space required for a dd backup.
image-utils can easily and accurately make a backup wile running on a live system; whereas dd will always fail if used to make a backup of a live system. Using dd to make a backup requires the SD card (or NVME) first be un-mounted!
The raw image file produced by image-backup can be used in a number of interesting ways – as described by Hiks Gerganov in this post on Baeldung
By comparison, for my systems (Lite; running headless), a backup of a 32GB SD card requires typically a 3-5GB *.img file, and 5-10 minutes; that includes the time for network transfer to a NAS device.
Another efficiency of image-utils is its ability to update an *.img file. In other words, instead of creating an entire new *.img file from scratch, it can update an existing *.img file to incorporate any changes to the filesystems since the last backup. This ability to update further reduces the time required for a backup from 5-10 minutes to (potentially) seconds.
How Do I Use This Repo?
This repo was created to make a current copy of the RPi image-utils toolset available through git. There are many resources available online describing the use of git, so these instructions are minimal. If you have questions, please consult a tutorial of your own choosing. The instructions below reflect using bash from a Raspberry Pi OS terminal or SSH, and assume that git is installed:
NOTE THAT a new folder named: ‘RonR-RPi-image-utils’ has been created
2. take a look around & verify the ‘git clone’ operation succeeded:
$ ls -la RonR-RPi-image-utils
drwxr-xr-x  2 pi pi  4096 Feb 26 15:29 deprecated
drwxr-xr-x  8 pi pi  4096 Feb 26 15:29 .git
-rw-r--r--  1 pi pi 14084 Feb 26 15:29 image-backup
-rw-r--r--  1 pi pi  1534 Feb 26 15:29 image-check
-rw-r--r--  1 pi pi  3714 Feb 26 15:29 image-chroot
-rw-r--r--  1 pi pi  3399 Feb 26 15:29 image-compare
-rw-r--r--  1 pi pi  3107 Feb 26 15:29 image-info
-rw-r--r--  1 pi pi  1667 Feb 26 15:29 image-mount
-rw-r--r--  1 pi pi  5711 Feb 26 15:29 image-set-partuuid
-rw-r--r--  1 pi pi  4150 Feb 26 15:29 image-shrink
-rw-r--r--  1 pi pi 13740 Feb 26 15:29 README.md
-rw-r--r--  1 pi pi  4086 Feb 26 15:29 README.txt
$
The README.md is this document – the one you’re reading now. The README.txt file contains RonR’s user’s guide for image-utils. The deprecated folder contains an old file discarded by RonR some time ago. The .git folder contains all of the “stuff” that makes git work. And the image-* files are the image-utils files. We’ll discuss what to do with the image-utils files below.
3. keep your clone synced to stay current:
Changes to image-utils are infrequent, but they do happen from time to time. You’ll want to keep your copies updated to match the latest release. Here’s how:
$ cd~/RonR-RPi-image-utils
$ git config pull.rebase false# this only needs to be done one time (the first time)
$ git pull # all subsequent updates require only this command
Staging & Usage
Once you’ve cloned the image-utils files to your local git repo, you’ll likely find they are much easier to use by following the very simple install procedure below. Assuming that /usr/local/sbin is in your PATH, using this install procedure makes the utilities easier to use from the command line, or (for example) in a cron job. Here’s how to install:
$ cd
$ sudo install --mode=755 ~/RonR-RPi-image-utils/image-* /usr/local/sbin
Creating vs. Updating .img backups
Refer to the Image File Utilities thread of the Raspberry Pi Forums site for documentation & support. The following is offered only as an illustration/example:
Create the .img backup:
To create a NEW image backup, use the sudo image-backup command; you will be prompted for inputs. The ones I typically use are shown below – immediately following the question mark ?:
$ sudo image-backup

Image file to create? /mnt/SynologyNAS/rpi_share/raspberrypi3b/20230212_Pi3B_imagebackup.img

Initial image file ROOT filesystem size (MB) [2317]? 2400

Added space for incremental updates after shrinking (MB) [0]? 200

Create /mnt/SynologyNAS/rpi_share/raspberrypi3b/20230212_Pi3B_imagebackup.img (y/n)?y
This will take a few minutes depending on your model Pi, the size of your file system & other variables. Upon completion, you should find the image file you specified in the location specified in your answer to the first prompt/question above. This image file contains everything exactly as it was in your file system at the time of the backup. This image file may be written to an SD card, or mount-ed as another file system on your RPi (you can use the image-mount utility for this).
Update an existing .img backup:
To update the image file you have created is even easier; sudo image-backup <IMG_TO_UPDT>, or:
A simple (not really tho) example of a discord bot which runs huggingface diffuserscontrolnet pipeline (the canny edges one, to be specific) in response to a slash command (/cannyremix <prompt>) with an input image attachment.
It is by no means complete, but should serve as a decent starting point for anyone who wants to implement a discord-bot interface to huggingface’s diffusers pipelines.
What is controlnet?
Huggingface has a great blog post where you can read more about all the crazy stuff you can do with controlnet.
Getting Started
Install controlnet dependencies. This should grab torch and everything else you need (I think, feel free to open an issue if I missed something)
There is a lot left to do here, but the basics are working, the bot will respond with a message containing the intermediate results of the diffusion, and update the image periodically until it gets the final result from the pipeline.
Comments
This was no small feat, as discord.py uses asyncio and diffusers’ pipelines are cpu bound and the progress callback isv not async friendly either. we end up needing to run the pipeline inside a thread and use a janus.Queue to send the intermediate and final images back to the async main thread so it can edit the bot’s message.
This had me stumped for a good 24 hours or so, and I’m really grateful for [janus]((https://github.com/aio-libs/janus) which made everything work in about 10 minutes once I came across it.
This Repo creates a project that you can clone to streamline MacOS python desktop app development. It contains all
necessary scripts to build your final project, as well as code-sign them from Apple (Developer Account required for some
features).
Quickstart: Building & Packaging Your App (last updated in v.4.0.1)
frompymacapp.buildtools.appimportAppfrompymacapp.buildtools.packageimportPackageimportos# CREDENTIALSAPPLE_DEVELOPER_EMAIL=os.environ["APPLE_EMAIL"]
APPLE_DEVELOPER_TEAM_ID=os.environ["APPLE_DEVELOPER_TEAM_ID"]
APPLE_APP_SPECIFIC_PASSWORD=os.environ["APPLE_APP_SPECIFIC_PASSWORD"]
APP_HASH=App.get_first_hash()
PKG_HASH=Package.get_first_hash()
## APP# create the app wrapperapp=App("My New App")
app.config("/path/to/main.py").build().sign(APP_HASH)
## PACKAGE# create the package wrapperpackage=Package(app, identifier="foo.bar")
# explicit authentication required starting in v.4.0.1package.login(APPLE_DEVELOPER_EMAIL, APPLE_APP_SPECIFIC_PASSWORD, APPLE_DEVELOPER_TEAM_ID)
# begin processingpackage.build().sign(Package.get_first_hash()).notarize()
package.log_full_notary_log()
package.staple()
Currently supports
This currently supports (and has been tested on) Python 3.9.9 on MacOS 11.6. This tool may work on other systems, but
has not been tested.
Feature (release phase):
Building .app files (beta)
Adding custom files/resources to app files (alpha) [removed]
Custom URI Scheme & QApplication Class w/ Event Handler (alpha)
Signing .app files (beta)
Building .pkg files (beta)
Signing .pkg files (alpha)
Notarizing .pkg files (alpha)
Stapling .pkg files (alpha)
Custom build commands, natively in Python (beta)
Full Setup (Code-signing)
Precursor – PyPi: PyMacApp
pip3 install PyMacApp
Uses PyInstaller, should install automatically
Precursor – Xcode
Make sure to have xcode installed, and verify that the xcode command line tools are installed:
Save this password (you will need it for notorizing)
Part 2: Get Your Hashes
(1/3) Create Certificates with XCode
Open XCode
In the top-apple Menu, go to XCode > Preferences > Accounts > Your Account > In the team, chose the Admin team >
Manage Certificates in the bottom-right
click the plus in the bottom corner
choose “Developer ID Application”
repeating, click the plus in the bottom corner
choose “Developer ID Installer”
(2/3) Get Certificates and Add to Project
Note: as of version 2.0.0, you should use the App.get_first_hash() and Package.get_first_hash() to get your hashes in your build.py script
to manually get hashes, run:
security find-identity -p basic -v
your output will look like:
HASH_OF_ID_HERE “Developer ID Application: …”
HASH_OF_ID_HERE “Developer ID Installer: …”
>
> 2 valid identities found
copy the appropriate hashes or simply use get_first_application_hash() or get_first_installer_hash() by
importing them (from pymacapp.helpers import get_first_application_hash, get_first_installer_hash)
(3/3) Create your Identifiers
developer.apple.com
choose “account” in top right
login
“Certificates, IDs, and Profiles”
on the left, switch to “Identifiers”
create two App IDs, one for your .app and one for your .pkg
it may be helpful to do something like com.your-domain.app-name for the .app
and com.your-domain.app-name.pkg for the .pkg
Coding Your App
Code your app however you’d like. You’ll need to identify a main script file (main.py or app.py); where ever you run
your program from, that is your main script file.
Advanced Customization
Pre- and Post-Install Scripting
Better docs coming soon; see example under Quickstart. Please feel free to email me (me@nicholasrbarrow.com) if you need advice on how I achieved this using PyMacApp.
Project History
This project began while performing work for Georgetown University’s Department of Italian Studies. The code herein was
needed to develop applications within the Department. Some of the code contains outside work, so this was a joint
collaboration.
Changelog
[4.0.1] 10.31.2023 (latest)
major refactoring due to deprecation of altool,
resolving #4
Package.notorize method has been renamed to Package.notarize to fix this embarrassing typo
removed Package.wait method in favor of Package.notarize(wait: bool)
Implicit authorization during Package.notarize, et al., removed in favor of an explicit call of the Package.login
method (see the Quickstart for demo auth flow)
added an example build-example.py and example application under the example folder in the project root
[1.1.1] 03.19.2022
added changelog to readme
updated readme’s quick-start example
cleaned the pymacapp directory (removed unsupported beta and old content)
added docstrings to all functions of App and Package
added function to output log if notary service fails during Package.notarize(…).wait(…)
[1.2.0] 03.20.2022
added alpha-feature: Resource (from pymacapp import Resource). This feature allows you to add custom files to
your application using the App.resource(…) method.
note: Resource feature is experiencing bug that is not yet patched.
[1.2.2] 03.22.2022
patching release 1.2.1
note: Resource feature is experiencing bug that is not yet patched.
[1.2.3] 03.26.2022
relocating custom commands (from pymacapp.command import cmd) and moving to beta
removing: Resource feature introduced in 1.2.0
[1.2.4] 03.26.2022
bug fixes
moving some subprocess commands from subprocess.Popen(...) to a custom function which
uses subprocess.run(...)
updating README
[1.2.5] 03.27.2022
added: new coverage for py-makespec (included with pyinstaller)
deprecated: App.setup(…); see below
added: App.config(…) to use new coverage for py-makespec
[1.2.6] 03.27.2022
minor bug fixes to new validators
[1.2.7] 03.27.2022
minor bug fixes to new coverage for py-makespec
[1.2.8] 03.27.2022
minor bug fixes to new coverage for py-makespec
[1.2.9] 03.27.2022
minor bug fixes to new coverage for py-makespec
[1.3.0] 03.28.2022
added: pymacapp.versioning.VersionLocker. This feature allows you to set a version (an unlimited-length string
of non-negative integers delimited by periods (‘.’)) and pymacapp will store the version number in a file whenever
its .lock() method is called (this is useful so that you can decide when to lock the version (i.e. do not lock
until after the app successfully builds, successfully packages, etc.)).
[2.0.1] 04.01.2022
reformatted major sections of the code to better structure the project for maintaining into the future
completed migration to modern subprocess utilization
[2.0.2] 04.01.2022
fixed README to reflect 2.0.1 changes
[2.0.3] 04.03.2022
fixed a bug where default entitlements.plist did not package
[2.0.4] 04.03.2022
continuing to fix a bug where default entitlements.plist did not package
[2.0.5] 04.03.2022
continuing to fix a bug where default entitlements.plist did not package
[2.0.6] 04.03.2022
fixing bug related to Scripts collecting
[2.0.7] 04.03.2022
fixing bug related to Scripts collecting
[2.0.8] 04.03.2022
fixing bug related to Scripts being made executable in non-terminal environments (i.e. PyCharm)
[2.1.0] 04.13.2022
adds the ability to use --hidden-import MODULENAME and --collect-submodules MODULENAME by passing lists of
module names in the App.config(...) command
[2.2.0] 05.13.2022
adds the (alpha) ability to define a custom schema (myappschema://...) to access/launch the app from a web
browser; define in the app.config(..., url_schema="...")
[2.2.1] 05.13.2022
bug fixes for v.2.2.0
[2.2.2] 05.13.2022
bug fixes for v.2.2.1 that caused a faulty specpath
[2.2.3] 05.14.2022
bug fixes for v.2.2.2 that caused a faulty specpath by moving the custom url_schema to a plist modification post-build
instead of modifying the spec file pre-build
[2.2.4] 05.14.2022
bug fixes for v.2.2.3
[3.0.1] 05.14.2022
major restructuring for the future of PyMacApp, now to include (a) buildtools and (b) runtools
pymacapp.buildtools contains, at this point, app and package which are designed to aid in the
creation of building, signing, and notorizing .app and .pkg files
pymacaoo.runtools is intended to contain tools for use in coding python applications
introduces CustomURIApplication, a subclass of QApplication for PySide6 to handle Custom URIs, pairing
with url_schema in App.build (from pymacapp.runtools import CustomURIApplication)
PyMacApp will now require PySide6 to support these new runtools
[3.0.2] 05.14.2022
relative import bug fixes
[3.0.3] 05.14.2022
bug fixes for setup.py
[3.1.0] 05.16.2022
adds the ability to set your own .spec file: App.config(use_custom_spec='/path/to/file.spec')
[3.1.1] 05.16.2022
adds a URIRouter (https://github.com/The-Nicholas-R-Barrow-Company-LLC/uri-router
or pip3 install URIRouter) to pymacapp.runtools.CustomURIApplication
[3.2.0] 06.13.2022
adds the ability to register the .app as having the ability to open extensions (.pdf, .docx, .txt, et cetera)


 https://github.com/bcgov/jag-rsbc-carma