Upload your local changes or stashed files to GitHub Gist.
🧐 About
Gistash is a CLI tool that lets you save your local changes or stashed file to GitHub gist.
The whole concept of git-stash to stash the changes in a dirty working directory away.
There is no option to share your stashed file with other conbtributors.
💡 Features
🗂 Upload multiple files at once
⏱ Reports each step
🔒 Safely storing your GitHub token on your local machine
👀 Public or private gist
📋 Copy url to clipboard or open in browser
⛏ Maintained
🔰 Installation
npm
$ npm i -g gistash
yarn
$ yarn global add gistash
🚶🏻♂️ Usage
$ gistash --help

Upload your local changes or stashed files to GitHub Gist.

Usage
	$ gistash <single|multiple file>

Options
	-p, --public     Set GitHub gist as public (default: false)
	-c, --copy       Copy GitHub gist url to clipboard (default: false)
	-o, --open       Open GitHub gist url in browser
	-m, --message    GitHub gist description
	-v, --version    gistash CLI version
	-h, --help       Showing all available commands
You can try the mobile app on your device by following this link : https://expo.io/@jesusthehun/lisk-bike.
Download the Expo Client app and scan the QR code.
BEFORE YOU USE THE DEMO be aware that it will reveal your real location and store it into the demo blockchain.
If you are in a private location, you might want to use a local blockchain instead.
Bike Location Behavior
The bike location is updated when you move with your phone.
Since bike are not visible on the map if they are already rented, you won’t see the bike’s position updated until you return the bike.
Development
Blockchain using Docker
For the first run we have to create the database before we start the node app.
cd blockchain
docker-compose build
docker-compose up -d psql
docker exec -ti lisk-psql psql -h localhost -U lisk -d postgres -c "CREATE DATABASE lisk_dev OWNER lisk"
docker-compose up -d nodejs
Next times you can use docker-compose start and docker-compose stop
Create some data
We will create two accounts, one for the company, one for rent.
The accounts will be store in json file in the script directory.
cd tests && node create-accounts.test.js
We will now create bikes using the company account.
The default bike location is in Paris, you can of course edit the script to change their default location.
node create-bikes.test.js ARG
Mobile app
The app has been created with Expo.
The blockchain needs to be running.
cd client && npm i
npm start
Scan the QR code with the Expo Client app and you are good to go !
Technical details
Rent & Return
To ensure consistency and reversability, both rent & return transaction must specify the previous transaction of each.
For example, to rent a bike you must specify the lastRentTransactionId and to return the bike you must specify the lastReturnTransactionId.
Read scripts for more details, they are pretty straight forward.
This repository contains the source code of FSMySQL for PHP7+ programming language. The main objective of this mysql connection system with small footprint is to be the fastest and most secure. Repository is currently live and maintained.
Guide
USAGE:
First Step -> Define the “MySQL” variable and set it to true. Example: define('MySQL', TRUE);
Second Step -> Require the connection.php file. Example: require_once('connection.php');
Third Step -> Create an instance or object of the DBConnect class. Example: $DBX = new DBConnect();
Fourth Step -> Query with built in function. Example: $DBX->dbquery('SQL Query', array('s', mixed $VALUE));
Fifth Step -> Destroy or unset the instance or object of the class. Example: unset($DBX);
The query command array can take multiple mixed values with the increasing number of “s” as “sss” form.
The try catch exception handler can provide full exception detail by providing the “$e” variable on the exit() function.
Features
Fastest connections due to php raw code implementation.
Most secure sql query courtesy of parameter and string escaping method.
Small footprint of just one file of 1.5KB.
PHP class for easy implementation to other methods.
Defined but synchronous garbage collection.
Bugs
[CRITICAL] Read sql statements not working due to the usage of result get array tag. [Issue #4]
Contribute
FSMySQL is licensed under the GNU General Public v3 License. Anybody is welcome to create issues and pull requests for different bugs and features. We highly acknowledge open source power.
Hii it is just my first project in java lang . Well it is also my first app and after 3 month of working , here is its beta version 1.0Beta. it may be full of error , coz we know Error is the best teacher for a programer .
ok let’s see a brief introduction on it.
Introduction
What is SafeGuard ?
In single sentence
SafeGuard is a totally offline assistant app that can detect some SOS Signal and can do some predefined work to deal with that situation.
Well i made this app specialy for protect female. We all know that girls/women are really not safe at this time.There are many cruel criminals outside home.Thus this app is in under Development it may arise many bugs and errors. You can report that by the in app Report button or you may contact me on this (error368280@gmail.com) email and report problem so that we can make the app better for decrease a little amount of the rate of crime.
Actually i forgot to say “why this app is necessary?”. Actually people can call 112 at the emergency situation but there are many examples of the situation where the victim doesn’t have the time to open his/her phone and call the emergency number. They are busy by either running from the criminal or by dealing with that painful situations. Didn’t they can survive if atleast his/her family or friends (whom they trust) was informed that there might be something wrong with their close one ? In my opinion yes it must be. See , in this situation they must atleast call to the person who may be in problem and confirm is everything all right!! Actually here how my app works 😅
Before we know how to use it or how it works , lets know some features that my app have.
features
Shake detection
Voice command
How it works ?
My app has a continuously Listening function so In a SOS situation the user can give some predefined voice commands or shake the device that give signal to the app that “User is in problem , we must help her”. By doing this a overlay pop-up will be display to confirm is it accidentally or not. If the user doesn’t give any response to it in 30 seconds, it will trigger its SOS mode.
In future i will also add some other way to detect the signal and also improve this app as better i can. Below i have put some important note to use my app.
IMPORTANT
I told that this app is under development and has a continuously listening funtion and also offline , it gonna process all the data in your device . So it can use cpu and battery too much.So when you feel safe and generaly when you at home or any other safe place stop the service from app. App>Home>Stop Button
Start the service only when you feel unsafe . It may not gonna hang your phone but it may take much battery. But you can keep the service ON always if you want . But highly recommend to Start the servie before leave home (generaly at night).
Sometime it may detect false things so when your device vibrate , it show a confirmation window . Remember to check it.
NOTE
Since due to privacy , Android restrict Background mic access .So the continuous listen function may misbehave or sometimes it may stop listening . In this case other trigger signal will work so I recommend you to use the shake function and other functiions (i will add soon). If you are using MIUI/Xiaomi phone , there is high chance that it will restict my voice trigger method. Sorry for that. But i am trying to fix this as soon as possible.
There is a high chance for monthly update . Thus i didn’t add any update alert method so pls check this site for update the app. Soon i will upload it in Google play store (if i got the permission).Later you can update from there.
Atlast my last word is-
STAY SAFE , STAY HAPPY , LIVE LIFE WITH JOY AND ENJOY YOUR FREEDOM. IT’S UR RIGHTS ~ERROR
Vonage API – Google Dialogflow integration sample application
This sample application allows you to call a phone number to interact with a Google Dialogflow agent using Vonage Voice API, including getting real time transcripts and sentiment analysis.
This application uses a Dialogflow reference connection code (more details below) for the actual 2-way audio interaction with the Dialogflow agent.
About this sample application
This sample application makes use of Vonage Voice API to answer incoming voice calls and set up a WebSocket connection to stream audio to and from the Dialogflow reference connection for each call.
The Dialogflow reference connection code will:
Send audio to the Dialogflow agent from caller’s speech,
Stream audio responses from the Dialogflow agent to the caller via the WebSocket,
Post back in real time transcripts and caller’s speech sentiment scores via webhooks call back to this Voice API sample application.
Once this application will be running, you call in to the phone number linked to your application (as explained below) to interact via voice with your Dialogflow agent.
Set up the Dialogflow reference connection code – Host server public hostname and port
Default local (not public!) reference connection code port is: 5000.
If you plan to test using Local deployment with ngrok (Internet tunneling service) for both the Dialogflow reference connection code and this sample application, you may set up multiple ngrok tunnels.
For the next steps, you will need:
The Dialogflow reference connection code server’s public hostname and if necessary public port.
e.g. xxxxxxxx.ngrok.io, xxxxxxxx.herokuapp.com, myserver.mycompany.com:32000 (as DF_CONNECTING_SERVER, no port, https:// nor http:// are necessary with ngrok or heroku as public hostname)
Set up your Vonage Voice API application credentials and phone number
Under Capabilities section (click on [Edit] if you do not see this section):
Enable Voice
Under Answer URL, leave HTTP GET, and enter https://<host>:<port>/answer (replace <host> and <port> with the public host name and if necessary public port of the server where this sample application is running)
Under Event URL, select HTTP POST, and enter https://<host>:<port>/event (replace <host> and <port> with the public host name and if necessary public port of the server where this sample application is running)
Note: If you are using ngrok for this sample application, the answer URL and event URL look like: https://yyyyyyyy.ngrok.io/answer https://yyyyyyyy.ngrok.io/event
Click on [Generate public and private key] if you did not yet create or want new ones, save the private.key file in this application folder. IMPORTANT: Do not forget to click on [Save changes] at the bottom of the screen if you have created a new key set.
Link a phone number to this application if none has been linked to the application.
Please take note of your application ID and the linked phone number (as they are needed in the very next section.)
The phone number linked to your application (as SERVICE_NUMBER), your phone will call that number,
The Dialogflow reference connection code server public hostname and port (as DF_CONNECTING_SERVER)
Overview on how this sample Voice API application works
On an incoming call to the phone number linked to your application, GET /answer route plays a TTS greeting to the caller (“action”: “talk”), then start a WebSocket connection to the Dialogflow agent reference connection (“action”: “connect”),
Once the WebSocket is established (GET /ws_event with status “answered”), it plays a TTS greeting to this Dialogflow agent, as the Dialogflow agent expects the user to speak first, we need to start the conversation as one would do in a phone call, with the answerer greeting the caller. The result is that the caller will immediately hear the Dialogflow agent initial greeting (e.g. “How may I help you?”) without having to say anything yet.
You can customize that inital TTS played to Dialogflow to correspond to your Dialogflow agent programming and use case.
Transcripts and sentiment scores will be received by this application in real time,
When the caller hangs up, both phone call leg and WebSocket leg will be automatically terminated.
Running Dialogflow sample Voice API application
You may select one of the following 2 types of deployments.
Local deployment
To run your own instance of this sample application locally, you’ll need an up-to-date version of Node.js (we tested with version 14.3.0).
Download this sample application code to a local folder, then go to that folder.
Copy the .env.example file over to a new file called .env:
cp .env.example .env
Edit .env file, and set the five parameter values:
API_KEY=
API_SECRET=
APP_ID=
SERVICE_NUMBER=
DF_CONNECTING_SERVER=
Install dependencies once:
npm install
Launch the applicatiom:
node df-application
Command Line Heroku deployment
You must first have deployed your application locally, as explained in previous section, and verified it is working.
If you do not yet have a local git repository, create one:
git init
git add .
git commit -am "initial"
Start by creating this application on Heroku from the command line using the Heroku CLI:
heroku create myappname
Note: In above command, replace “myappname” with a unique name on the whole Heroku platform.
On your Heroku dashboard where your application page is shown, click on Settings button,
add the following Config Vars and set them with their respective values:
API_KEY
API_SECRET
APP_ID
SERVICE_NUMBER
DF_CONNECTING_SERVER
add also the parameter PRIVATE_KEY_FILE with the value ./private.key
Now, deploy the application:
git push heroku master
On your Heroku dashboard where your application page is shown, click on Open App button, that hostname is the one to be used under your corresponding Vonage Voice API application Capabilities (click on your application, then [Edit]).
See more details in above section Set up your Vonage Voice API application credentials and phone number.
From any phone, dial the Vonage number (the one in the .env file). This will connect to the DialogFlow agent (as specified in the .env file), and you will be able to have voice interaction with it.
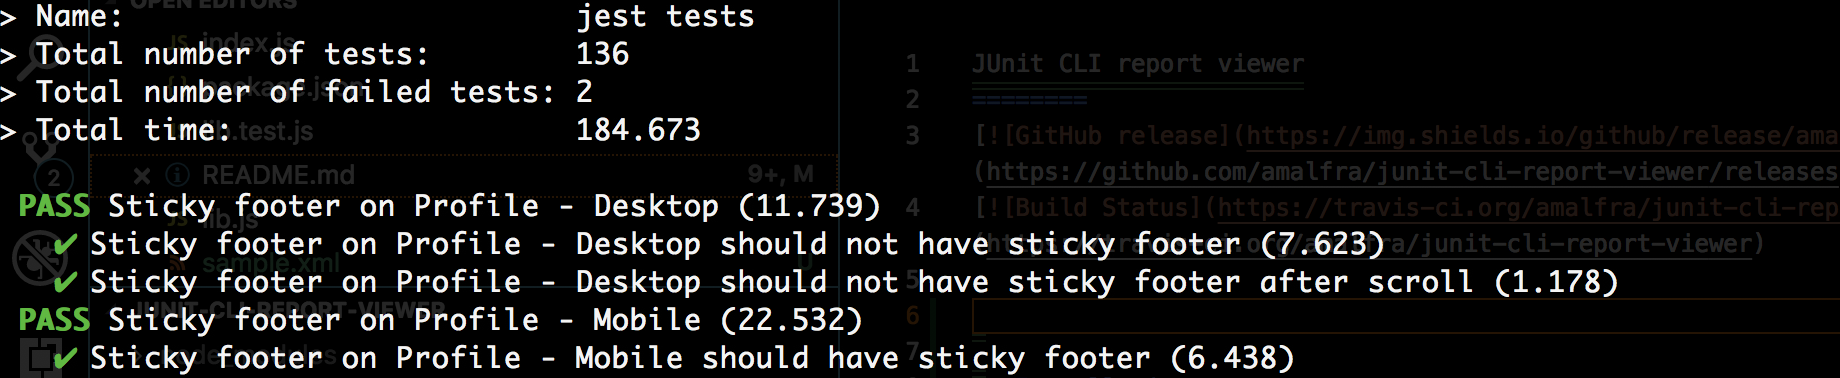
JUnit CLI report viewer is a commandline tool to generate CLI reports from JUnit XML format file. It generates a pretty report from provided XML file as shown below.
Installation
Run following command
npm install -g junit-cli-report-viewer
junit-cli-report-viewer command will now be available in your shell.
Usage
Pass the path to JUnit XML format file as commandline argument to junit-cli-report-viewer command. For eg:
--logs flag is to support outputting the stdout and stderr logs for each test case.
Development
Questions, problems or suggestions? Please post them on the issue tracker.
You can contribute changes by forking the project and submitting a pull request. Feel free to contribute 😍
UNDER MIT LICENSE
The MIT License (MIT)
Copyright (c) 2018 Amal Francis
Permission is hereby granted, free of charge, to any person obtaining a copy of this software and associated documentation files (the “Software”), to deal in the Software without restriction, including without limitation the rights to use, copy, modify, merge, publish, distribute, sublicense, and/or sell copies of the Software, and to permit persons to whom the Software is furnished to do so, subject to the following conditions:
The above copyright notice and this permission notice shall be included in all copies or substantial portions of the Software.
THE SOFTWARE IS PROVIDED “AS IS”, WITHOUT WARRANTY OF ANY KIND, EXPRESS OR IMPLIED, INCLUDING BUT NOT LIMITED TO THE WARRANTIES OF MERCHANTABILITY, FITNESS FOR A PARTICULAR PURPOSE AND NONINFRINGEMENT. IN NO EVENT SHALL THE AUTHORS OR COPYRIGHT HOLDERS BE LIABLE FOR ANY CLAIM, DAMAGES OR OTHER LIABILITY, WHETHER IN AN ACTION OF CONTRACT, TORT OR OTHERWISE, ARISING FROM, OUT OF OR IN CONNECTION WITH THE SOFTWARE OR THE USE OR OTHER DEALINGS IN THE SOFTWARE.
OOP uses seperate files with concerning tasks – Its better for group work and organized processes
Do more in less time: Develop together, changes of code can be made collectively
You can re-use the code (less code to compile)
Easier to build larger websites
Basic PHP (Procedural PHP) still has to be learned for the basic understanding
Why MVC?
it’s a design pattern who takes care of database processes and CRUD-Operations
When you chose the way to write PHP-Code with OOP, you automatically start working to use MVC
Although connecting to MySQL-Database the procedural way is improved with i = MYSQLI, but for every other file
you have to duplicate the code. MVC makes it much easer (1 to 3 are three different “people” or classes):
0) We want to share our secrets and content: DB
1) Model = Is the "CEO", which knows everything about the database stuff, connecting to database for example)
2) View = "Sells stuff for custommers" and works as a communicator in between (gets data from the model and tries to sell it to the controller)
3) Controller = "Custommer who wants to buy stuff" (where the users do their input and catch infos from the model)
OOP with MVC: “Kurz und knackig” – “Short and Crisp” 🍪
[GER]
Alles wird in Objekte beschrieben
Jedes Objekt hat Eigenschaften
In den Eigentschaften speichern wir Daten in Form von Funktionalitäten (Methoden)
Prozesse zeigen wir mit Methoden auf. Ein Haus z.B mit verkaufen() / abreissen() etc. || Methoden werden immer so dargestellt: Beispiel()
[ENG]
Everything is described in OBJECTS
Each OBJECT has PROPERTIES
In properties we store data in the form of functionalities (METHODS)
We show processes with METHODS. A house, for example, with sell() / demolish() etc. || Methods are always represented like this: Example()
II) Use BACKSLASH ( \ ) before inverted commas ( ” ) to interrupt the closing of a string ( \ ” ):
$code .= "<p><a href=\"movie.php?id=".$out['id']."\">Zum Film</a></p>";
/*1) <a href="" src="" nuten auch Anführungszeichen! Setze ein \ davor um den String nicht abzubrechen!2) Wird ein String interrupted I) mit ". .", so setzen wir KEIN \ davor!*/
III) Pro tip: Use ( ‘ ) and ( ” ) to avoid taking care of Tip II) with ( \ ):
<div>
   <label for="vorname">Vorname</label> // for="" des Labels zugehörig zur id="" des Inputs
   <input type="text" id="vorname" name="vorname" value="<?=$vornameValue?>"><br> // name="" wichtig für Affenschwanz Duchgang / value="" PHP Inhalte aus Datenbank anzeigen
</div>
OOP and PDO: Important TERMS in this WEBAPP_KUNGFU: 📈
Term (word):
Explenation:
“INSTANZIERUNG” ->
$instanz => “Bauplan” (Wichtig: Nach -> NICHT Dollarzeichen verwenden, da Variable dadurch instanziert wird)
“AUSGABE”
$ausgabe = Ausgabenvariable “Fernseher”, um “Bauplan” durch Ausrufen der Instanz-> anzuzeigen
“new”
Instance a class from .class File to Main-File to create a new object (A)
PROCEDURAL PHP
Regular PHP with tons of code with NO SEPERATE FILES AND CONCERNING TASKS vs:
OOP PHP with MVC
Object Oriented Programming which uses a design pattern called Model View Controller
MVC – Model View Controller
In OOP, we divide the code into certain areas / files: 1)=> A model file (connecting to database) 2)=> A view file (to show what the user has done) and 3)=> A control area (where users do their input), and link them together.
PDO
PHP Data Object, which helps to connect to database in OOP {{{ PDO > CRUD_beispiel / loginWithPDO }}} (Top)= PDO > MySQLi > MySQL =(flop)
QUERIES
Databaserequests. Be sure to use prepared statements to guarantee the maximum amount of safety! To run a query: prepare() > bindParam() > execute()
ARRAY
Data structure that stores one or more similar type of values in a single name
CLASS (I)
A OOP-package of Methods and Properties
METHOD (II) + (visability)
A OOP-function …() in a class {} (I) – Each method has an unique relation to the class you nested it inside of it {}
PROPERTY (III) + Visability:
“Eigenschaft in OOP”: A variable “$” in a class {} to capture a value in this variable + you HAVE TO define the visability as public, protected or private…
“public”
Visability-Accessmodifier: “The counter is open for all” TIP: At first, set everything to Public to make sure your project works.
“protected”
Visability-Accessmodifier: “The counter is closed to the public, department among themselves can continue to operate”. With “protected”, the superclass can “lock the door”, the subclasses “act as emergency keys”
“private”
Visability-Accessmodifier: With “private”, access can neither be guaranteed via main and class files, nor via class inheritance.
$this
$this-Keyword is used to call Methods (II) and Properties (III) in a class (I) “Bauch der Instanzierung”
OBJECT (A) with “new” in main-processing-document
Instance (“Instanzierung”) of a class with an allocated memory (“Sammlung von Variablen”) in the MAIN FILE (index file) => We can define it as a “BLUEPRINT”
MEMBERS
The “called” Methods (II) and Properties (III) in an object (A)
CONSTRUCTOR
function __construct() => Konstruktor-Methode-Infrastrukur (“Grundversorgung einer Methode”(II)) am Anfang einer Klasse (Destructor = Am Ende einer Klasse)
INHERITANCE with:
“Vererbung” with Superclasses (HEREDITARY = VERERBEND) and Subclasses (INHERITED = ERBEND)
SUPERCLASS > SUBCLASS
Subclasses are CHILDS, subordinated and inherited of their PARENTS, known as Superclasses
EXTENDS
Keyword: “subclass of” => class HUND extends HAUSTIER = Therefore: “Hund ist eine Subklasse von Haustier”
/* ---- .CLASS FILE AUSGELAGERT ---- */// 0) METHODE definieren: Funktion "rechne()" in einer Klasse "QuadratZahl1"// Ausgelagert in .class-Ordner require("class/QuadratZahl1.class.php");class QuadratZahl1 {
// +(Methode)+functionrechne($anna) {
$resultat = $anna * $anna;
return$resultat; // return, kein echo notwendig
}
}
/* ---- MAIN FILE (PROCESSING FILE) ---- */// 0) Auf das ausgelagerte File zugreifenrequire("class/QuadratZahl1.class.php");
// 1) Object-Instanzierung (Instanz erhält mit "new"-Anweisung die Spezielkraft, Klasse wird mit seinem Namen instanziert)$instanz = newQuadratZahl1();
// 1.1) OPT: var_dump() zeigt den Inhalt dieser Klasse aufvar_dump($instanz);
// 2) Aufrufen in der Instanzvariable mit Parameter (hier 5) und als Ausgabevariable definieren für das spätere Echo$ausgabe = $instanz -> rechne(5);
/* ---- MAIN FILE HTML ---- */// 3) Als echo im HTML ausgebenecho$ausgabe; // 25
1.3 METHODE – MIT PROPERTY (EIGENSCHAFT) und VALUE + public + $this + MEHREREN AUSGABEN: — (Click HERE to view in folder) —
/* ---- .CLASS FILE AUSGELAGERT ---- */class QuadratZahl2 {
// public-EIGENSCHAFT "PROPERTY" ist wie eine "VOREINSTELLUNG" in Variable $AntwortSatz. d.h:// Wir geben im Bauch des Antwortsatzes automatisch diesen String mit:// +(Property mit Value)+ (Dieser String wird der DEFAULT-WERT sein von dieser property) public$AntwortSatz = "Das Resultat ist: ";
// +(Methode)+functionrechne($anna) {
/* $this (Zugreifen, was innerhalb der Klasse definiert wurde) - Mit $this wird auf die Eigenschaft zugegriffen, die in allen Methoden sichtbar sind ("Im Bauch der Methode suchen") - Mit $this macht man einen Verweis auf das eigene Objekt aus der VOREINSTELLUNG - Beachte, dass das $-Zeichen vor "AntwortSatz" fehlt!!! */$resultat = $this->AntwortSatz.$anna * $anna;
return$resultat;
}
}
/* ---- MAIN FILE ---- */require("class/QuadratZahl2class.php");
$instanz = newQuadratZahl2();
$ausgabe1 = $instanz -> rechne(5); // "rechne()" kümmert sich um "25", public gibt den String mit$ausgabe2 = $instanz -> AntwortSatz; // Hier geben wir nur den String mit/* ---- MAIN FILE HTML ---- */echo$ausgabe1; // Das Resultat ist 25echo$ausgabe2; // Das Resultat ist
1.4 METHODE – MIT PROPERTY (EIGENSCHAFT) OHNE VALUE (ft. D.Krossing) —
/* ---- Beispiel ---- *//* ---- .CLASS FILE AUSGELAGERT ---- */// +(Class)+class Person {
// +(Properties ohne default Wert)+public$name;
public$eyeColor;
public$age;
// +(Methods)+publicfunctionsetName($name) {
$this->name = $name;
}
}
/* ---- MAIN FILE ---- */require("class/...");
// +(Object)+$instanz = newPerson();
$ausgabe = $instanz -> setName("Sven");
/* ---- MAIN FILE HTML ---- */echo$ausgabe; // Sven
/* ---- .CLASS FILE AUSGELAGERT ---- */class Konstruktiv {
// +(Property)+ (Schlüsselwort Ausgabe)public$ausgabe;
// +(Konstruktormethode)+ (Hier wird die GRUNDVERSORGUNG angegeben = WAS DAS OBJEKT ZUM ÜBERLEBEN BRAUCHT)function__construct() { // Immer mit 2x _ schreiben $string = "Ich wurde geboren am ";
$string .= date("d.m.y")." um ";
$string .= date("H:i:s");
// Hier wird mit echo gearbeitet, dies jedoch nur aus didaktischen Gründen (KEIN RETURN)!!!echo$string; // KEIN return sondern direkt das echo, wenn man __construct() verwendet
}
}
/* ---- MAIN FILE ---- */require("class/Konstruktiv.class.php");
$instanz = newKonstruktiv();
/* ---- MAIN FILE HTML ---- */// "ausgabe" NICHT $ausgabe nach -> da instanziertecho$instanz -> ausgabe; // Ich wurde geboren am (Timestamp Datum) um (Timestamp Zeit)
/* ---- .CLASS FILE AUSGELAGERT ---- */class KonstruktivPara {
// Die Konstruktormethode empfängt Parameter (Briefkastenvariablen reinschreiben)// +(Constructor-Method)+function__construct($param1,$param2) {
$str = "Guten Tag ";
// Hier wird mit echo gearbeitet, dies jedoch nur aus didaktischen Gründen!!!echo$str.$param1."".$param2;
}
}
/* ---- MAIN FILE ---- */require("class/KonstruktivPara.class.php");
// Die Konstruktormethode wird mit Parameter in Form von x2 Strings"" aufgerufen// Instanzierung mit new und Klassenname() (In $instanz ist der ganze Bauplan):$instanz = newKonstruktivPara("Peter","Muster");
/* ---- ERSTES .CLASS FILE AUSGELAGERT (SUPERKLASSE) ---- */// * Superklasse *class Haustier {
// Es hat drin: + Porperties (Eigenschaften) für ALLE Haustierepublic$geschlecht;
public$name;
public$art;
// Es hat drin: + Methode für ALLE HaustierefunctionWasBinIch() {
$string = "Über mich: Ich bin ein/e ";
$string .= $this->art.", "; // $this = Referenz auf Objekt public $art$string .= "ich heisse ".$this->name;
$string .= " und ich bin ".$this->geschlecht;
return$string;
}
}
/* ---- ZWEITES .CLASS FILE AUSGELAGERT (SUBKLASSE) ---- */// Hier braucht's das Schlüsselwort "extends"// Somit ist diese Klasse HUND offiziell eine Subklasse von HAUSTIERclass Hund extends Haustier {
// Diese METHODE gibt's NUR HIER, in der Subklassefunctionbellen() {
$meineWoerter = "Wuff, Wuff";
return$meineWoerter;
}
}
/* ---- MAIN FILE ---- */require("class/Haustier.class.php");
require("class/Hund.class.php");
// Instanziiert wird hier NUR DIE SUBKLASSE! - "new Hund()" reicht// Trotzdem stehen darauf die Mitglieder der Superklasse im Objekt zur Verfügung.$instanz = newHund();
// Eigenschaften schreiben, man beachte:// diese gehören zur Instanz der Subklasse, obwohl sie in der Superklasse definiert wurden!!!// Über die Instanz ansprechen:$instanz -> geschlecht = "männlich";
$instanz -> name = "Waldi";
$instanz -> art = "Hund";
// 1) Methode der SUPERKLASSE aufrufen, man beachte:// diese gehört zur Instanz der Subklasse, obwohl sie in der Superklasse definiert wurde!!!$ausgabe1 = $instanz -> WasBinIch();
// 2) Methode der SUBKLASSE aufrufen:$ausgabe2 = $instanz -> bellen();
/* ---- MAIN FILE HTML ---- */echo$ausgabe1;
echo"<br>";
echo$ausgabe2;
/* ---- ERSTES .CLASS FILE AUSGELAGERT (PROTECTED-SUPERKLASSE) ---- */// * Superklasse *class SchatzkisteProtected {
protectedfunctionzeigeCodeFuerSchatz() {
$source = "<img src=\"bilder/treasurechest.png\">";
return$source;
}
}
/* ---- ZWEITES .CLASS FILE AUSGELAGERT (SUBKLASSE) ---- */// * Subklasse */* Hier definieren wir die Subklasse welche nicht geschützt ist ABER mit internem ZUGRIFF auf Superklasse */class SchatzkisteKind extends SchatzkisteProtected {
publicfunctionKindMethode() {
// Aufruf einer Methode in der Superklasse, die mit protected definiert ist$raus = $this -> ZeigeCodeFuerSchatz();
return$raus;
}
}
/* ---- MAIN FILE ---- */require("class/SchatzkisteProtected.class.php");
require("class/SchatzkisteKind.class.php");
$instanz = newSchatzkisteKind();
/* Zugriff auf eine öffentliche Methode der SUBKLASSE, die (intern) auf eine Methode der Superklasse zugreift, welche ihrerseits mit protected definiert ist: Sprich: Superklasse verschliesst die Tür, die Subklasse ist unser Notschlüssel! */$ausgabe = $instanz -> KindMethode();
/* ---- MAIN FILE HTML ---- */echo$ausgabe;
/* ---- ERSTES .CLASS FILE AUSGELAGERT (SUPERKLASSE) ---- */// * Superklasse *class SchatzkistePrivate {
/* Opt: - Ändere private zu protected, um die Subklasse zu schützen und den Error hier zu löschen! Somit kann die Subklasse ihren part übernehmen - Ändere private zu public, so wird die Superklasse direkt ausgeführt und die Subklasse wäre eigentlich hinfällig */privatefunctionzeigeCodeFuerSchatz() {
$source = "<img src=\"bilder/treasurechest.png\">";
return$source;
}
}
/* ---- ZWEITES .CLASS FILE AUSGELAGERT (SUBKLASSE) ---- */// * Subklasse *// Hier braucht's ebenfalls das Schlüsselwort "extends"
/class SchatzkisteKind2 extends SchatzkistePrivate {
publicfunctionKindMethode() {
// Aufruf einer Methode in der Superklasse SchatzkistePrivate, die mit private definiert ist// Dies schlägt fehl$raus = $this -> ZeigeCodeFuerSchatz();
return$raus;
}
}
/* ---- MAIN FILE ---- */require("class/SchatzkistePrivate.class.php"); // Auslagerung der Superklasse (set to private)require("class/SchatzkisteKind2.class.php"); // Auslagerung der Subklasse (set to public)$instanz = newSchatzkisteKind2();
// 1) Zugriff auf eine öffentliche Methode der Subklasse SchatzkisteKind2...// 2) ...die (intern) auf eine Methode der Superklasse SchatzkistePrivate zugreift...// 3) ...welche ihrerseits mit private definiert ist.// 4) Das schlägt fehl! Der Notschlüssel$ausgabe = $instanz -> KindMethode();
/* ---- MAIN FILE HTML ---- */echo$ausgabe;
/* ---- .CLASS FILE AUSGELAGERT ---- */class SchatzkistePrivatePlus {
// Properties kann man mit Sichtbarkeit schalten, METHODEN enbenfalls!// Somit setzen wir die ertse Methode auf PRIVATE...privatefunctionzeigeCodeFuerSchatz() {
$source = "<img src=\"bilder/treasurechest.png\">";
return$source;
}
// ...und die zweite Methode auf PUBLIC:// Innerhalb der KLASSE kann auf die obige Methode zugegriffen werden, auch wenn diese mit private definiert ist:publicfunctionzweiteMethode() {
$sourceVonOben = $this -> zeigeCodeFuerSchatz();
return$sourceVonOben;
}
}
/* ---- MAIN FILE ---- */require("class/SchatzkistePrivatePlus.class.php");
$instanz = newSchatzkistePrivatePlus();
// Zugriff auf eine öffentliche Methode,// die (intern) auf eine andere Methode der gleichen Klasse zugreift,// welche ihrerseits mit private definiert ist$ausgabe = $instanz -> zweiteMethode();
/* ---- MAIN FILE HTML ---- */echo$ausgabe;
/* Localhost siehe: http://localhost/OOP/webapp_kungfu/PDO/CRUD_beispiel/create.php (Create ist hier der "index.php") */// Welche Funktionen haben die Files?
* SimpleCRUD.class.php = Verwaltungsfile von Klassen und Methoden [prepare() > bindParam() > execute()] + PDO Datenbankzugriff
* credentials.php = Datenbankangaben
* create.php = Index.php File mit Inputfelder [CRUD = Create]
* read.php = Lesefile [CRUD = Read]
* read_erweitert.php = Tabelle mit [CRUD = Read, Update, Delete]
* update.php = Update mit ID, wenn User fon read_erweitert.php auf UDPATE klickt [CRUD = Update]
1.2. Beispiel eines simplen Logins (sign in) OHNE Registrierung (no sign up) — (Click HERE to view folder) —
/* Localhost siehe: http://localhost/OOP/webapp_kungfu/PDO/loginWithPDO/login_form.php (login_form ist hier der "index.php") */// Welche Funktionen haben die Files?
* SimpleCRUD.class.php = Verwaltungsfile von Klassen und Methoden [prepare() > bindParam() > execute()] + PDO Datenbankzugriff
* credentials.php = Datenbankangaben
* login_form.php = Index.php File quasi, Login-Formular mit Inputfelder
* login_tabelle.sql = Datenbankformular, wo 2 Nutzer bereits erstellt sind, siehe: test_user.txt
* success.php = Privater Bereich, falls Login erfolgreich
// Falls man PASSWÖRTER HASHEN möchte...1) Im Browser anzeigen lassen:
echopassword_hash("YourPasswordHere", PASSWORD_DEFAULT);
2) Rauskommentieren und Username sowie Passwort aufschreiben
3) Passender Hash zum Passwort wird zur SQL-Liste hinzugefügt
// Passing an array to set share buttons$meditationTool.setShareButtons(['GPLUS','FACEBOOK']);// You also can passing a two-dimensional array to render multi-line share buttons$meditationTool.setShareButtons([['FACEBOOK'],['GPLUS','TWITTER'],['DOUBAN','WEIBO','RENREN']]);
setCopyright
Configure copyright information in the post page. Support HTML tags.
Notice: For security you only can call the method once in synchronized manner.
Usage:
$meditationTool.setCopyright('<p>Any code you want to insert to the copyright label</p>');
Development setup
# install dependencies
npm install

# start webpack-dev-server
npm run dev
Permission is hereby granted, free of charge, to any person obtaining a copy
of this software and associated documentation files (the “Software”), to deal
in the Software without restriction, including without limitation the rights
to use, copy, modify, merge, publish, distribute, sublicense, and/or sell
copies of the Software, and to permit persons to whom the Software is
furnished to do so, subject to the following conditions:
The above copyright notice and this permission notice shall be included in all
copies or substantial portions of the Software.
THE SOFTWARE IS PROVIDED “AS IS”, WITHOUT WARRANTY OF ANY KIND, EXPRESS OR
IMPLIED, INCLUDING BUT NOT LIMITED TO THE WARRANTIES OF MERCHANTABILITY,
FITNESS FOR A PARTICULAR PURPOSE AND NONINFRINGEMENT. IN NO EVENT SHALL THE
AUTHORS OR COPYRIGHT HOLDERS BE LIABLE FOR ANY CLAIM, DAMAGES OR OTHER
LIABILITY, WHETHER IN AN ACTION OF CONTRACT, TORT OR OTHERWISE, ARISING FROM,
OUT OF OR IN CONNECTION WITH THE SOFTWARE OR THE USE OR OTHER DEALINGS IN THE
SOFTWARE.


 https://github.com/mittalyashu/gistash